Creative Coding Final
 When I started this project, the idea for a transforming gauntlet animation was heavily influenced by Iron Man’s character design in the Marvel movies.
Here's the rough model and it's the animation that I made for this project.
When I started this project, the idea for a transforming gauntlet animation was heavily influenced by Iron Man’s character design in the Marvel movies.
Here's the rough model and it's the animation that I made for this project.
 Besides the need for a VR headset and an OptiTrack motion capture system, there were a couple of things I need to get some extra equipment. I did want to do wireless things but time was tight so I went ahead and got some USB extension cables for serial connection. I also went and got a super long
wire for connecting the Oculus to the computer. I already had some resistors I used from the kit I already had too. After researching what to get,
I went ahead and ordered all the things.
Besides the need for a VR headset and an OptiTrack motion capture system, there were a couple of things I need to get some extra equipment. I did want to do wireless things but time was tight so I went ahead and got some USB extension cables for serial connection. I also went and got a super long
wire for connecting the Oculus to the computer. I already had some resistors I used from the kit I already had too. After researching what to get,
I went ahead and ordered all the things.
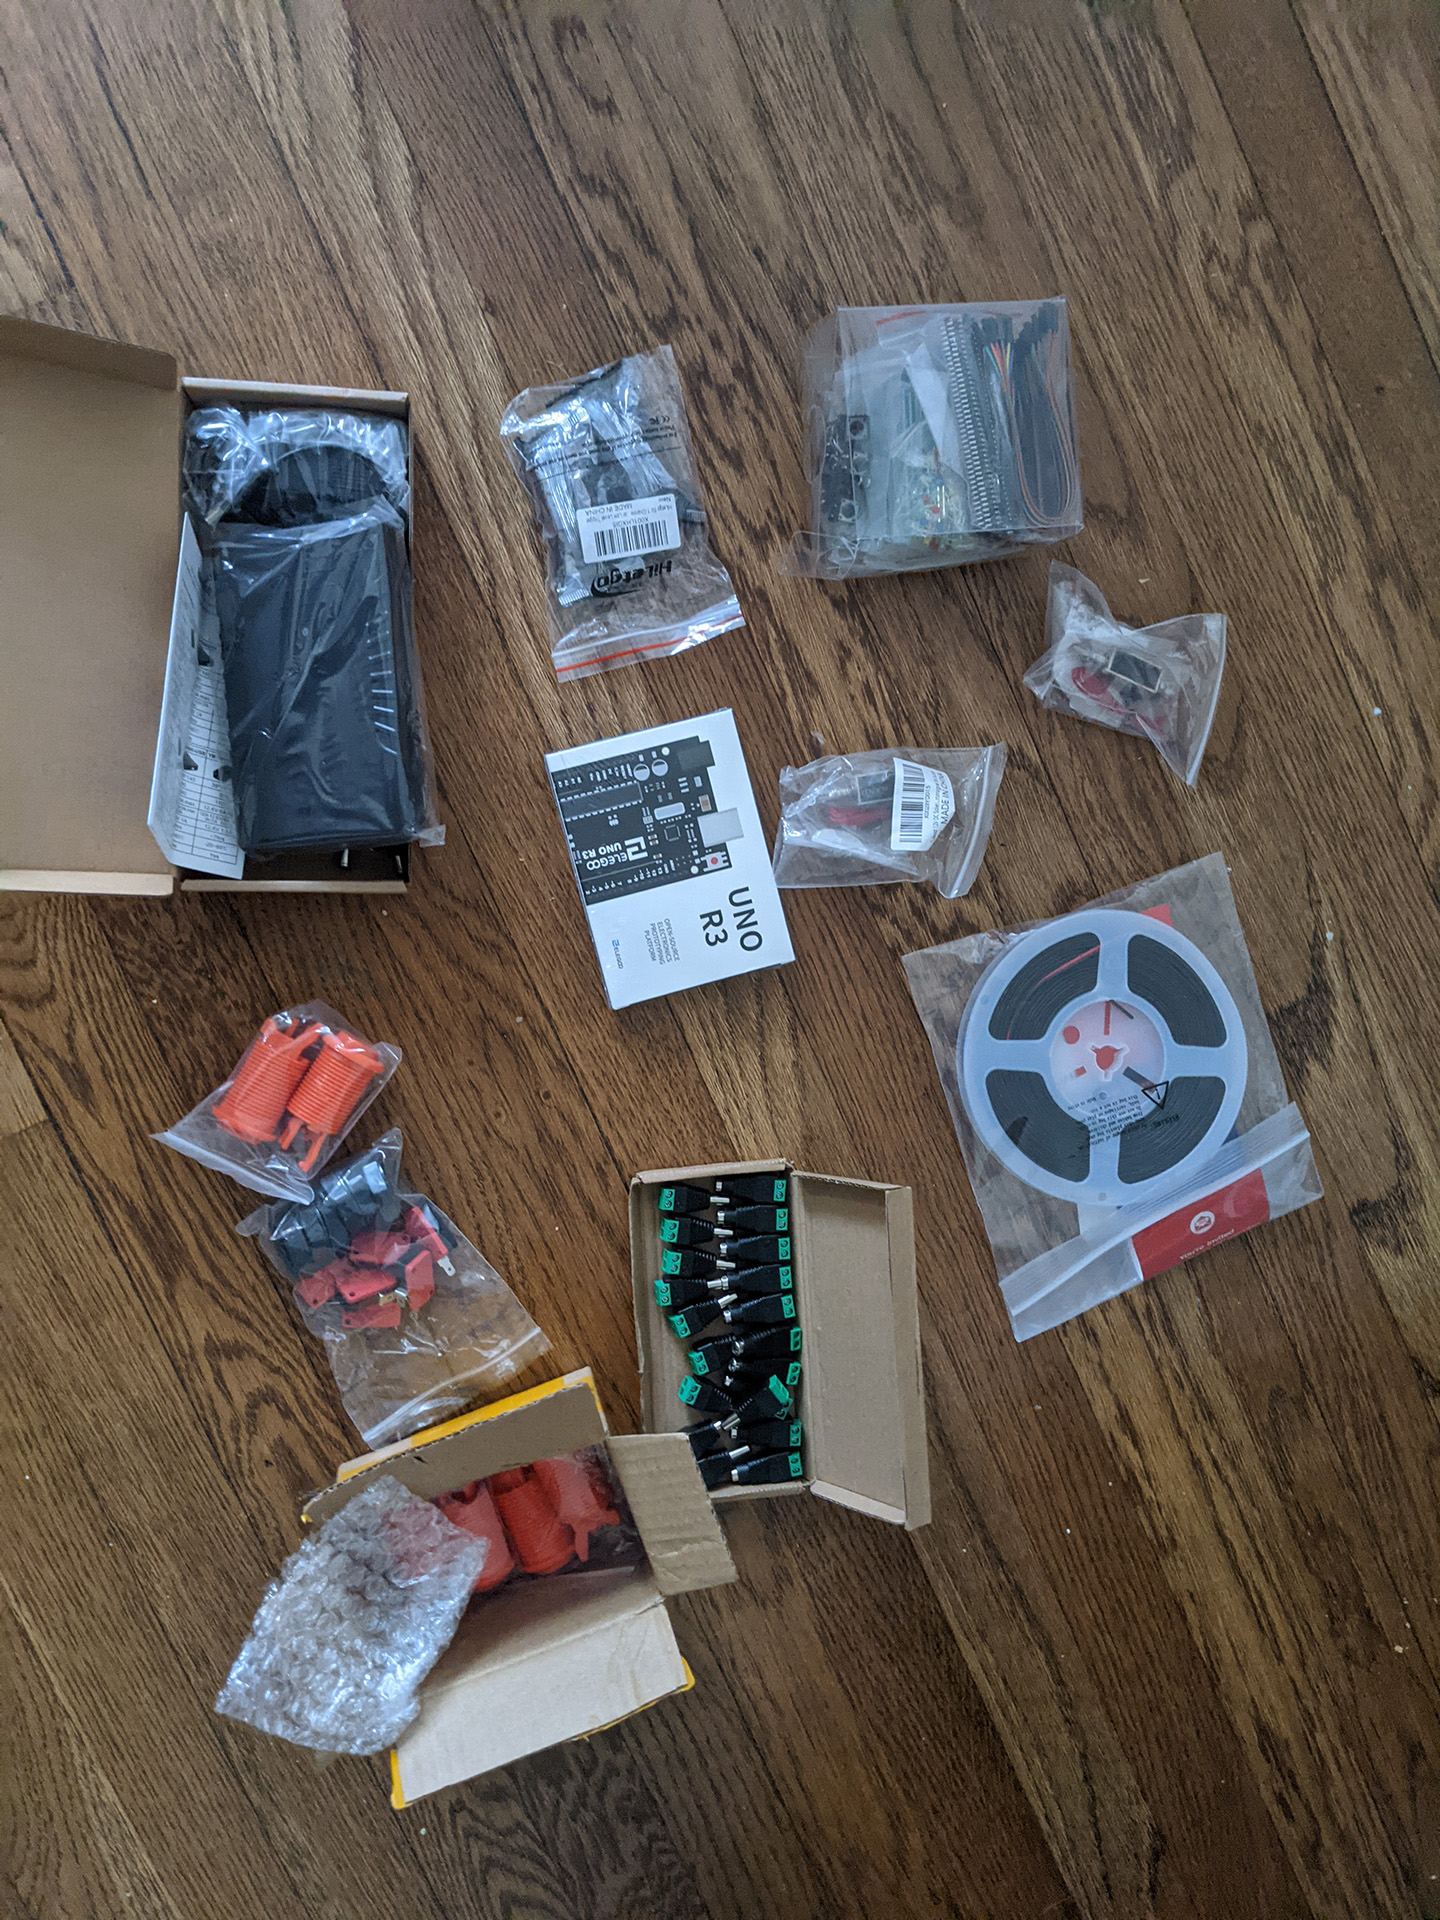 Arcade buttons made for a great clicky feeling, extra wire for connecting things, a 12v power bank to
reduce the number of wires a little bit, an extra microcontroller in case my only one broke (which it did...), 12v male/female dc jack plug adapters to plug
things together and make a custom long wire to the power bank, a little kit of PCB boards and connectors, two solenoids for the haptic feedback, a diode for
regulating the correct electricity along with the module relay.
Arcade buttons made for a great clicky feeling, extra wire for connecting things, a 12v power bank to
reduce the number of wires a little bit, an extra microcontroller in case my only one broke (which it did...), 12v male/female dc jack plug adapters to plug
things together and make a custom long wire to the power bank, a little kit of PCB boards and connectors, two solenoids for the haptic feedback, a diode for
regulating the correct electricity along with the module relay.
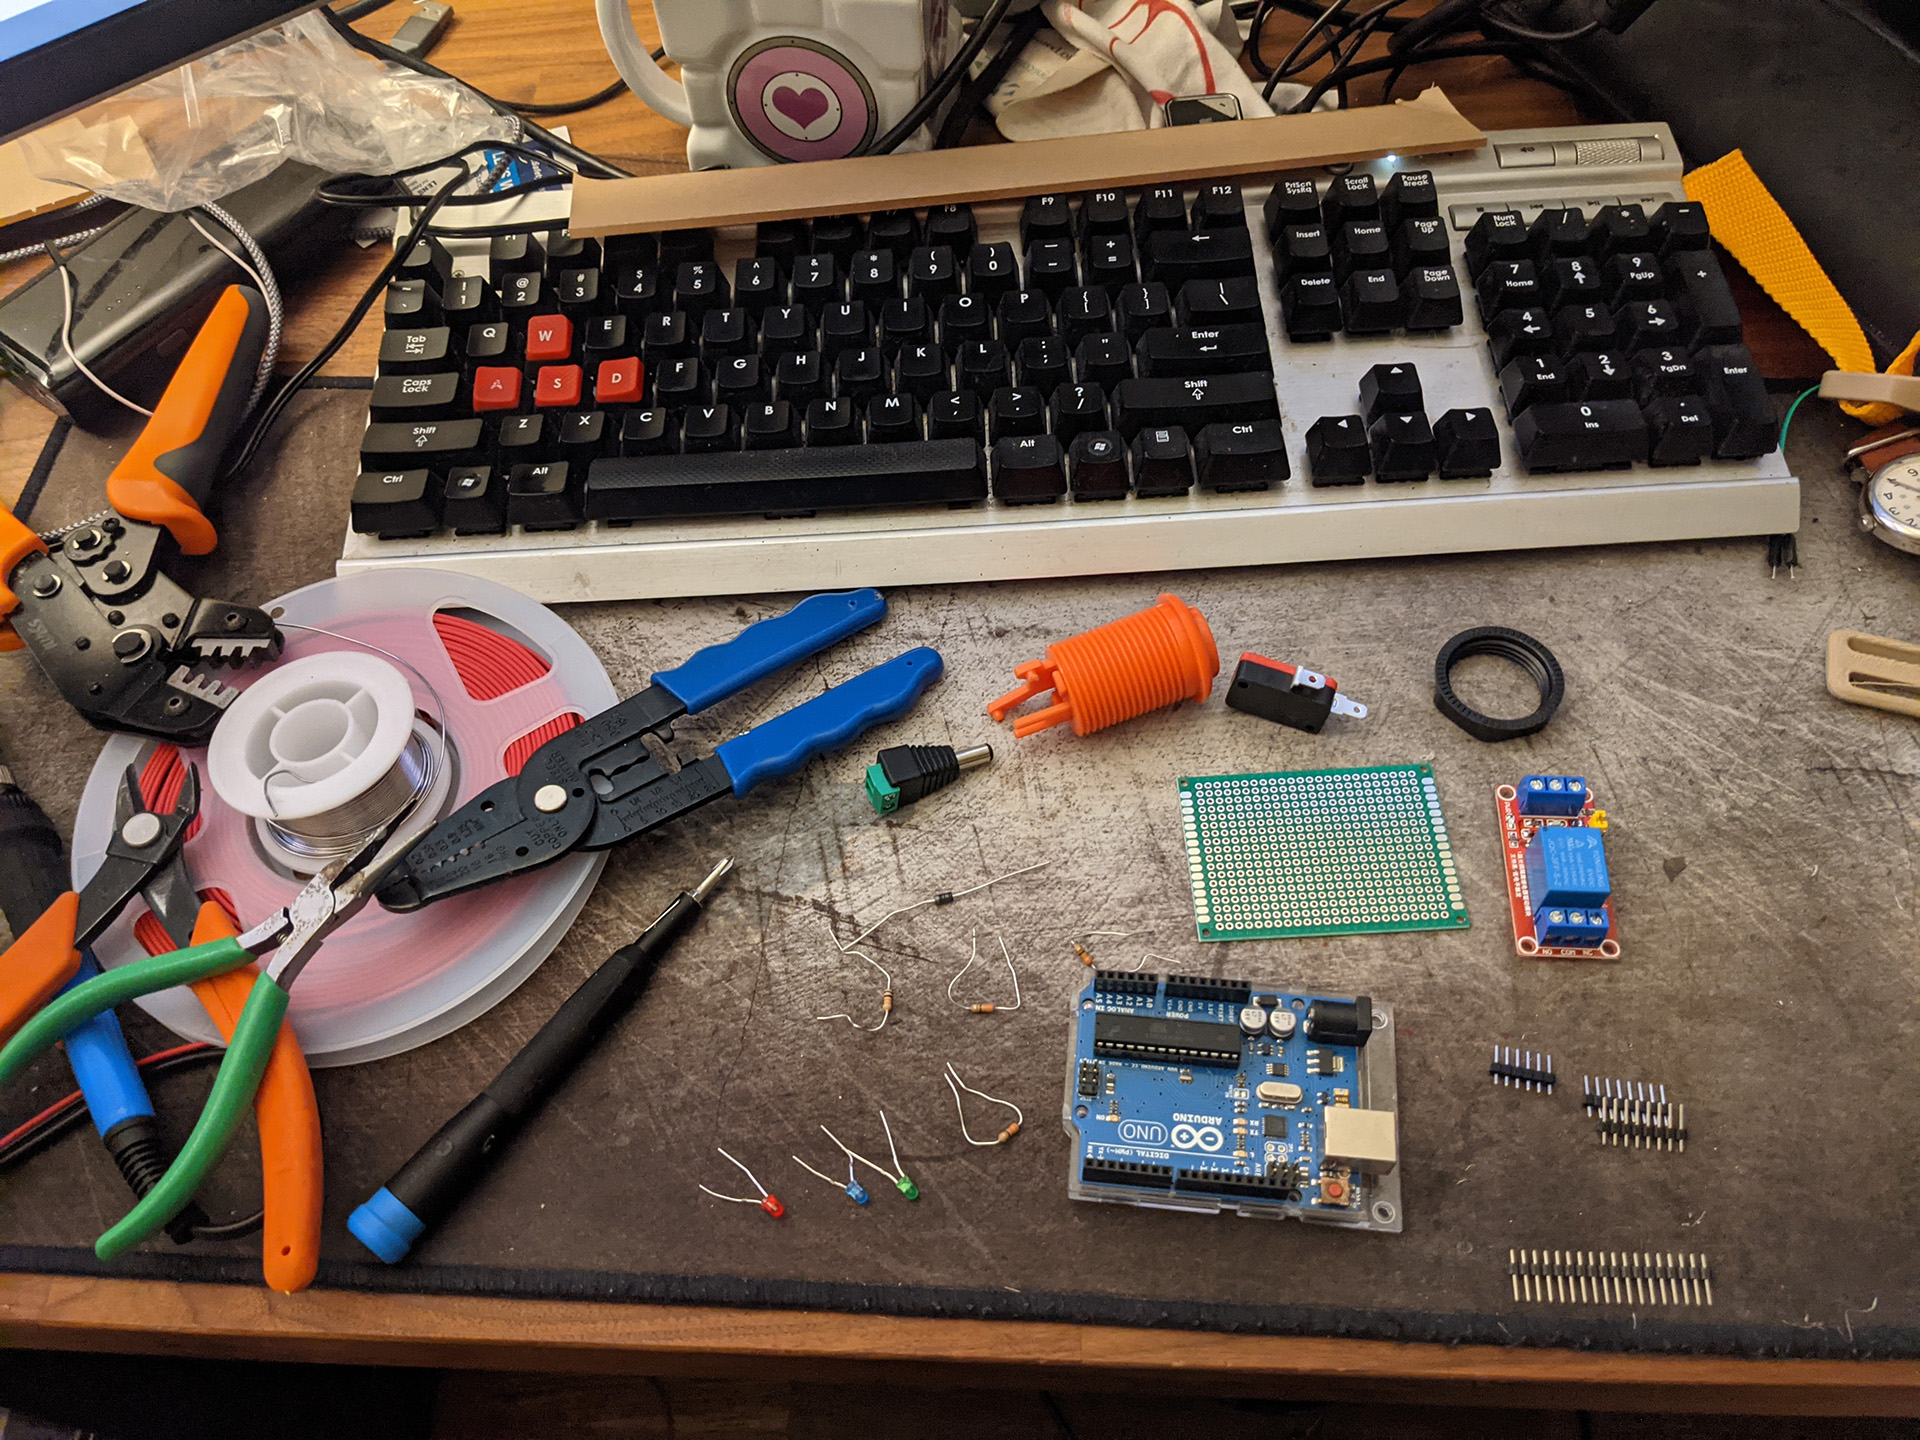
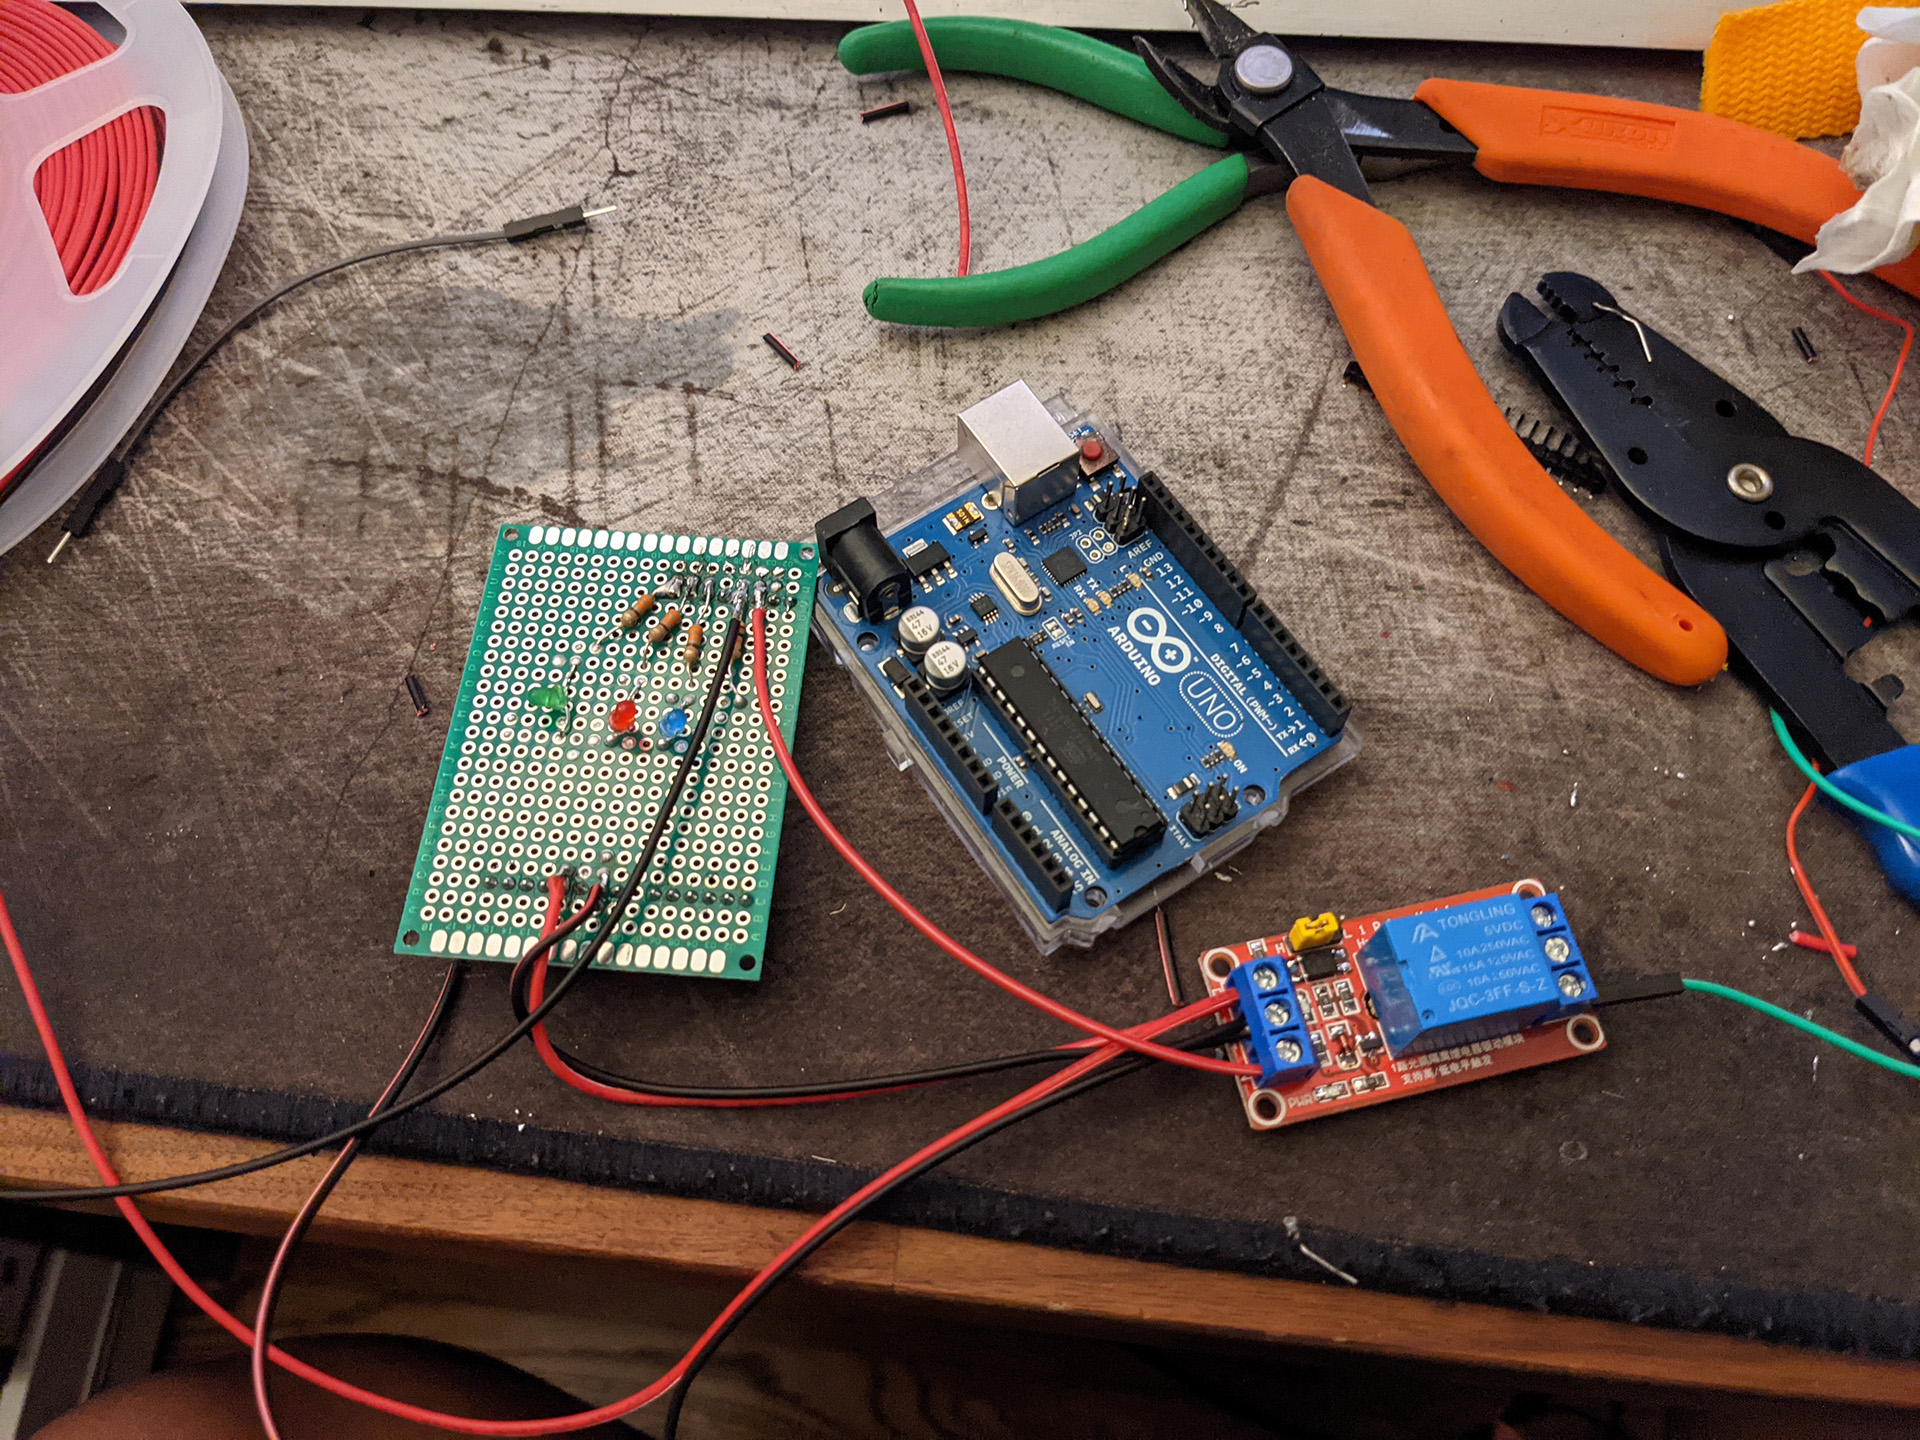
 After much effort in reading up on how to connect things to relays, diodes, etc, and testing a bunch of code, this was the final layout of all my electronics.
The 5V from the Arduino along with the ground go into the breadboard, the relay connects the solenoids to the 12v power which is regulated by the diode,
which is connected to one of the digital pins to know when to have power sent or not.
The button is connected with the higher level resistor along with the three different LEDs for debugging which have the lower-powered resistors all into digital pins.
After much effort in reading up on how to connect things to relays, diodes, etc, and testing a bunch of code, this was the final layout of all my electronics.
The 5V from the Arduino along with the ground go into the breadboard, the relay connects the solenoids to the 12v power which is regulated by the diode,
which is connected to one of the digital pins to know when to have power sent or not.
The button is connected with the higher level resistor along with the three different LEDs for debugging which have the lower-powered resistors all into digital pins.
 After hooking everything up I got solenoids working with some simple Arduino code to move when I have the button pressed, I wanted to make sure that
none of my hardware was faulty or that none of my electronics spontaneously combusted before I ran out of time to order replacements.
After hooking everything up I got solenoids working with some simple Arduino code to move when I have the button pressed, I wanted to make sure that
none of my hardware was faulty or that none of my electronics spontaneously combusted before I ran out of time to order replacements.
 At this point, I had tested everything on my breadboard and decided to solder some stuff together on the PCB like in the original reference I found.
This prevents things from popping out of place when I set everything up with the motion capture and when I make something to attach to my arm. With
so many moving pieces, one little wire popping out can cause a huge headache of troubleshooting and time wasted.
At this point, I had tested everything on my breadboard and decided to solder some stuff together on the PCB like in the original reference I found.
This prevents things from popping out of place when I set everything up with the motion capture and when I make something to attach to my arm. With
so many moving pieces, one little wire popping out can cause a huge headache of troubleshooting and time wasted.
 I did have a summer job once doing soldering the whole time so luckily I had some experience in this.
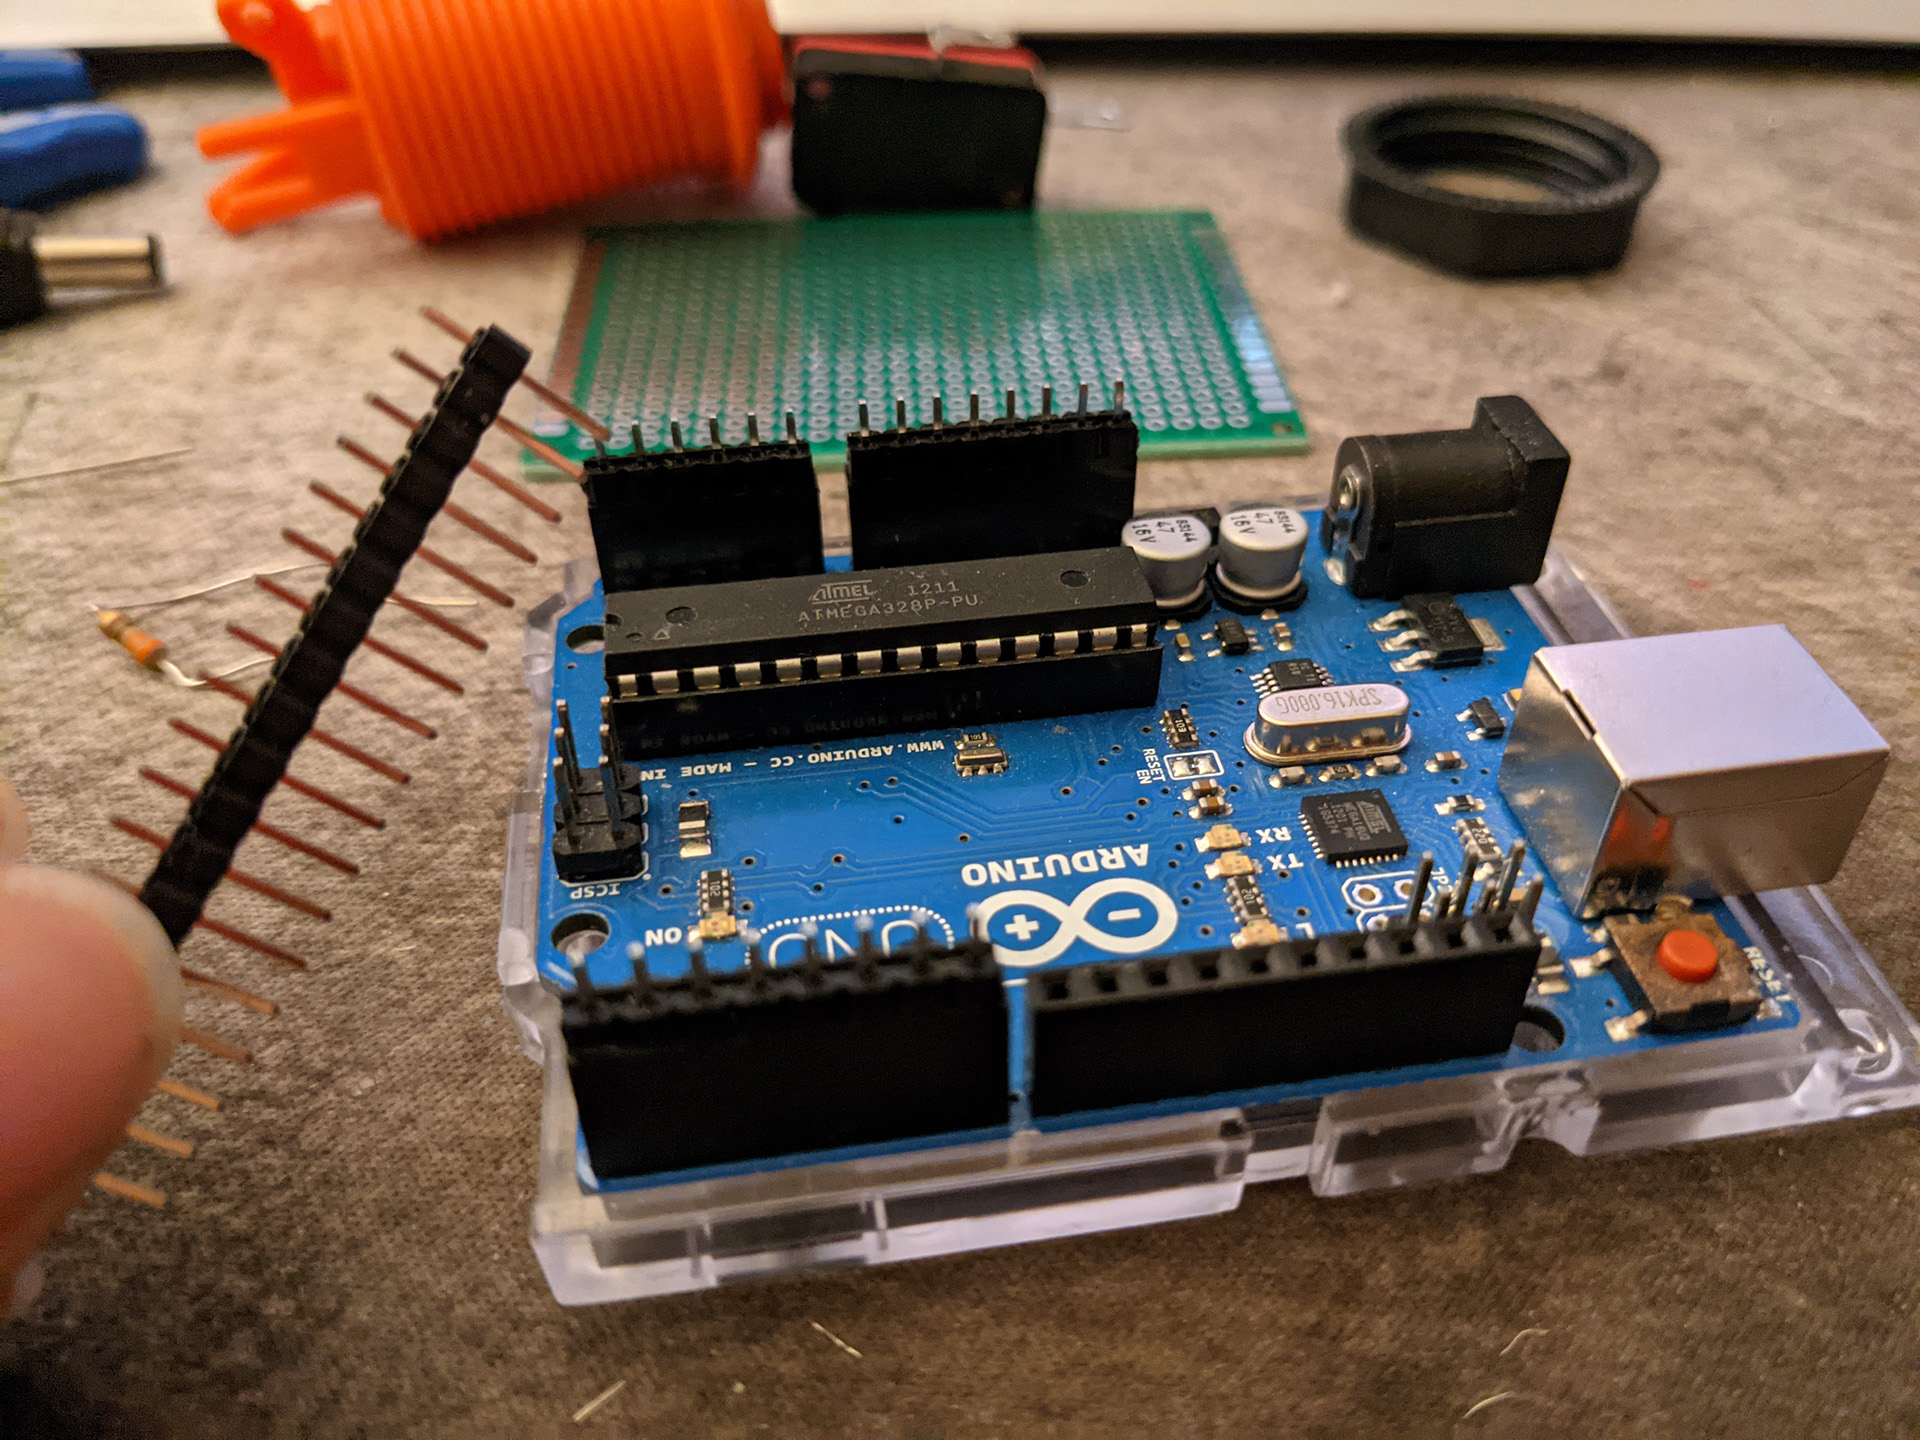
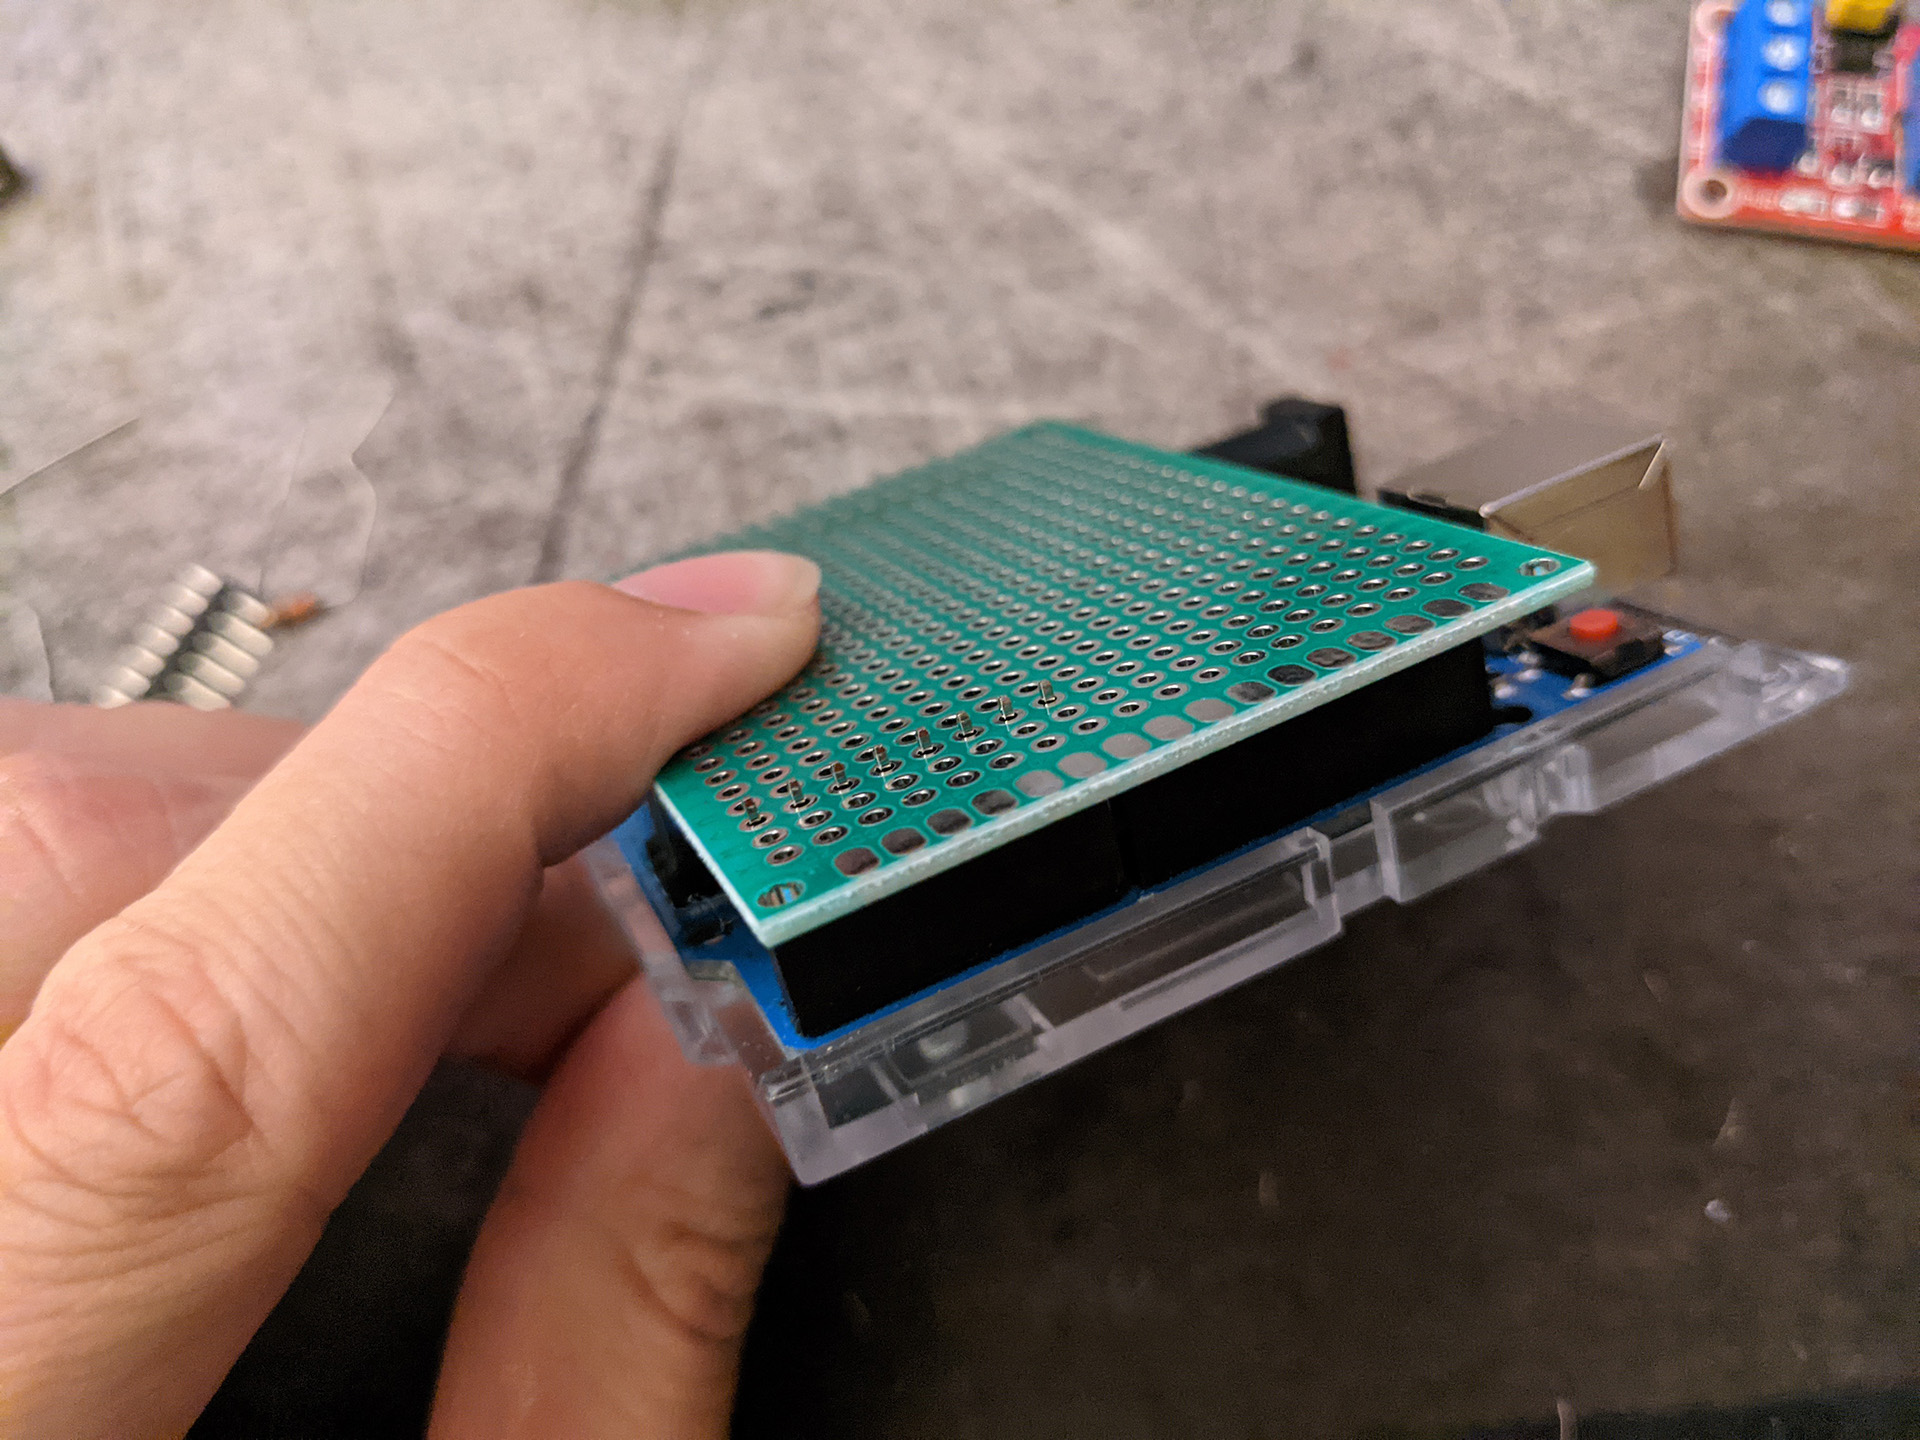
This part was is sorta new to me, but first I attached some pins into the Arduino and then sandwiched a PCB on top to decide where the pins would get soldered on.
I did have a summer job once doing soldering the whole time so luckily I had some experience in this.
This part was is sorta new to me, but first I attached some pins into the Arduino and then sandwiched a PCB on top to decide where the pins would get soldered on.
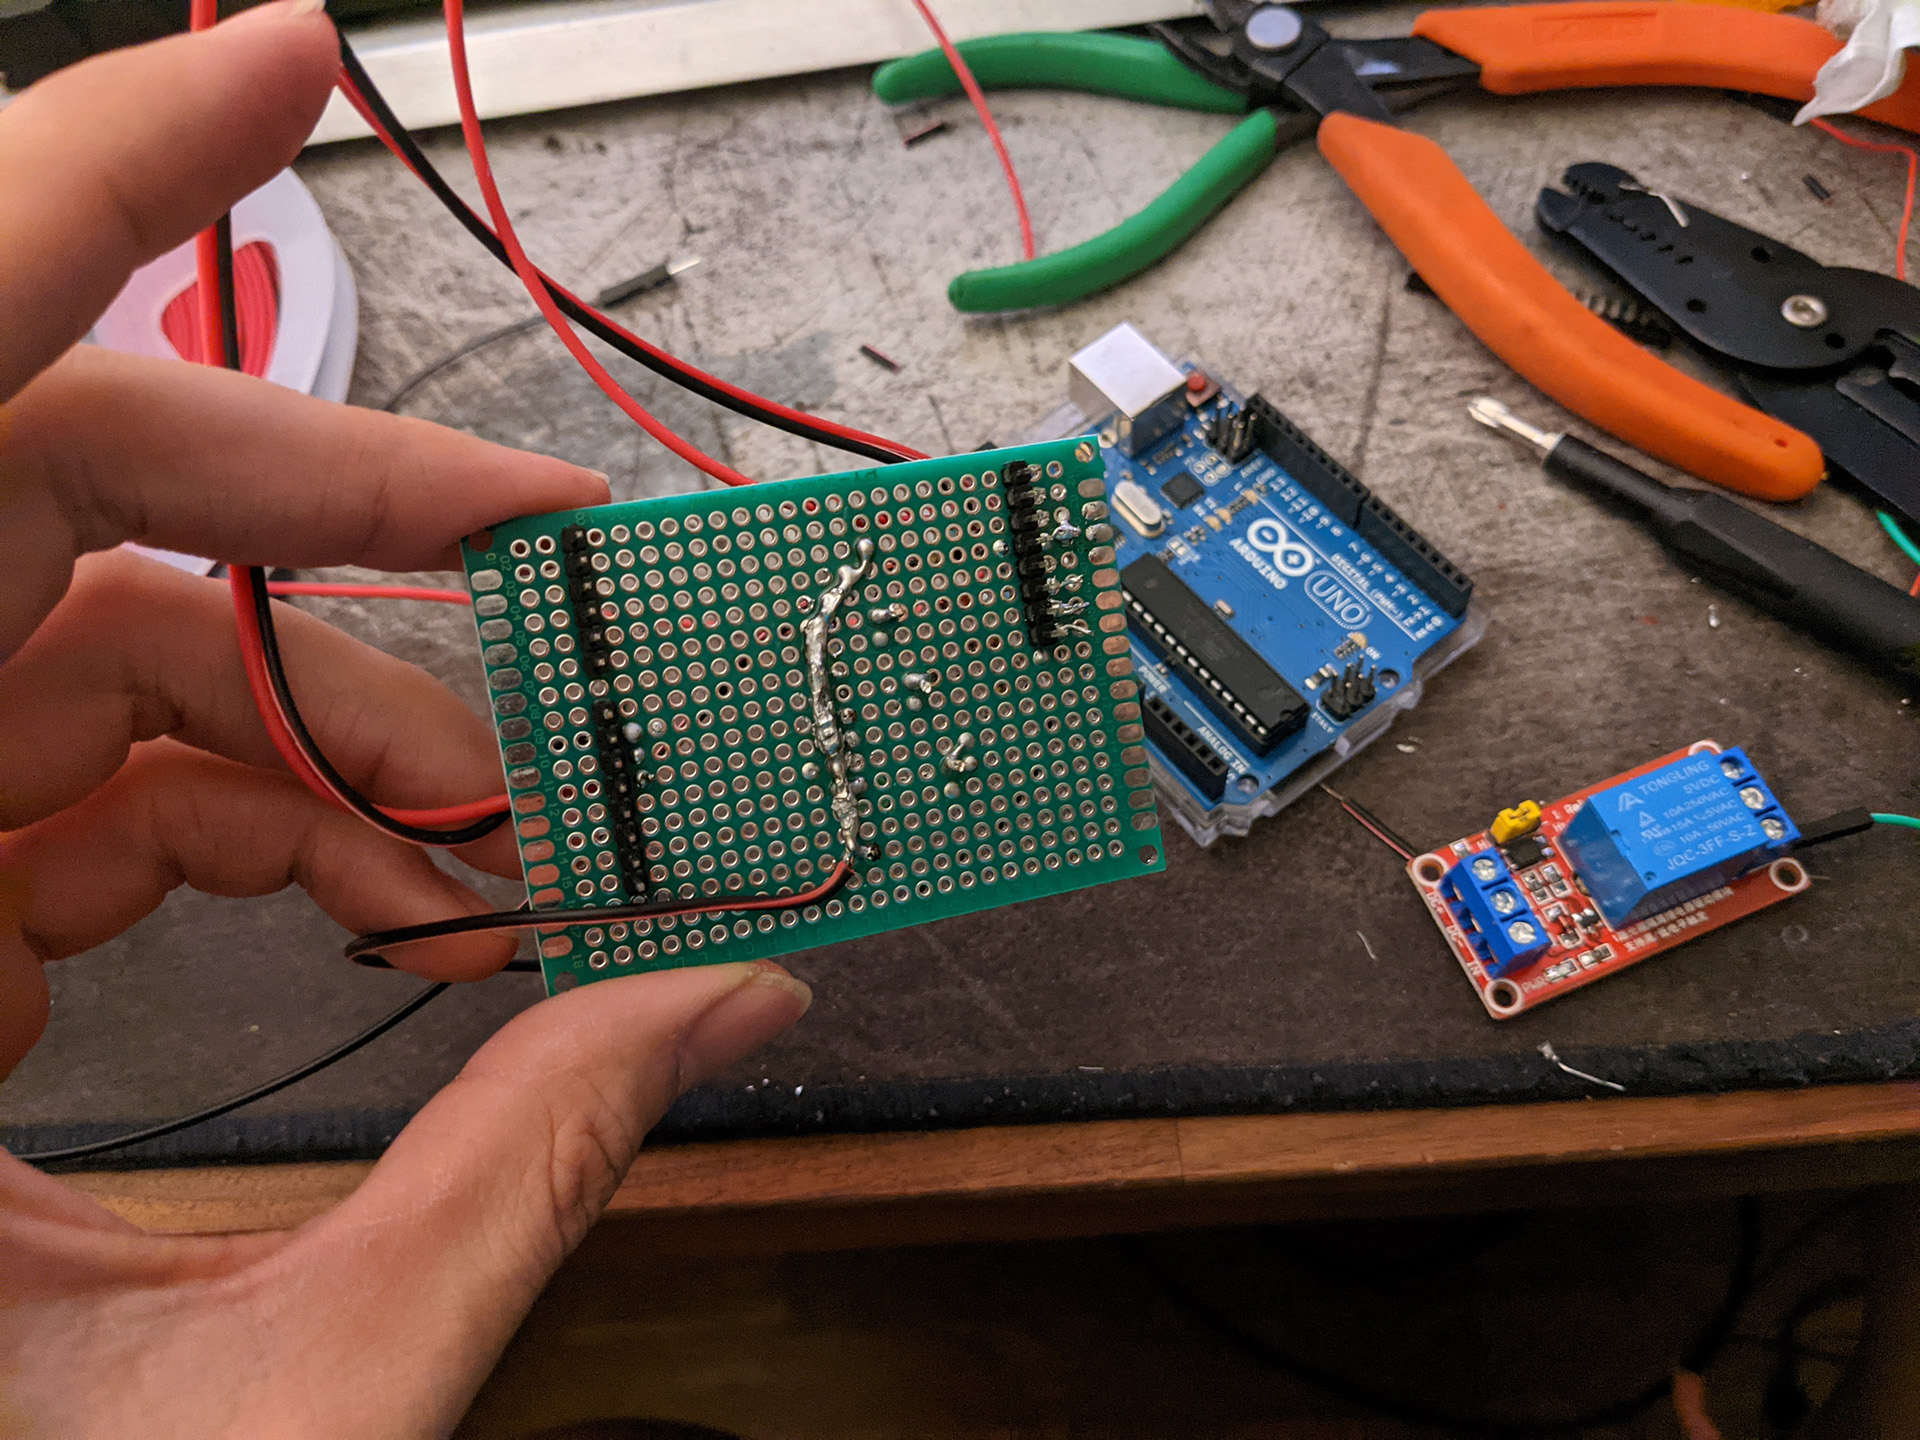 After that I stuck in all my resistors, LEDs and wires into the holes, bent the pins underneath and soldered everything together acording to the basic
electrical knowlege I had.
After that I stuck in all my resistors, LEDs and wires into the holes, bent the pins underneath and soldered everything together acording to the basic
electrical knowlege I had.
 Next thing I did was hot glue my components to a piece of scrap laser cut wood I had sitting around, drilled some holes into it, and screwed in some
nylon straps I also had laying around.
Next thing I did was hot glue my components to a piece of scrap laser cut wood I had sitting around, drilled some holes into it, and screwed in some
nylon straps I also had laying around.
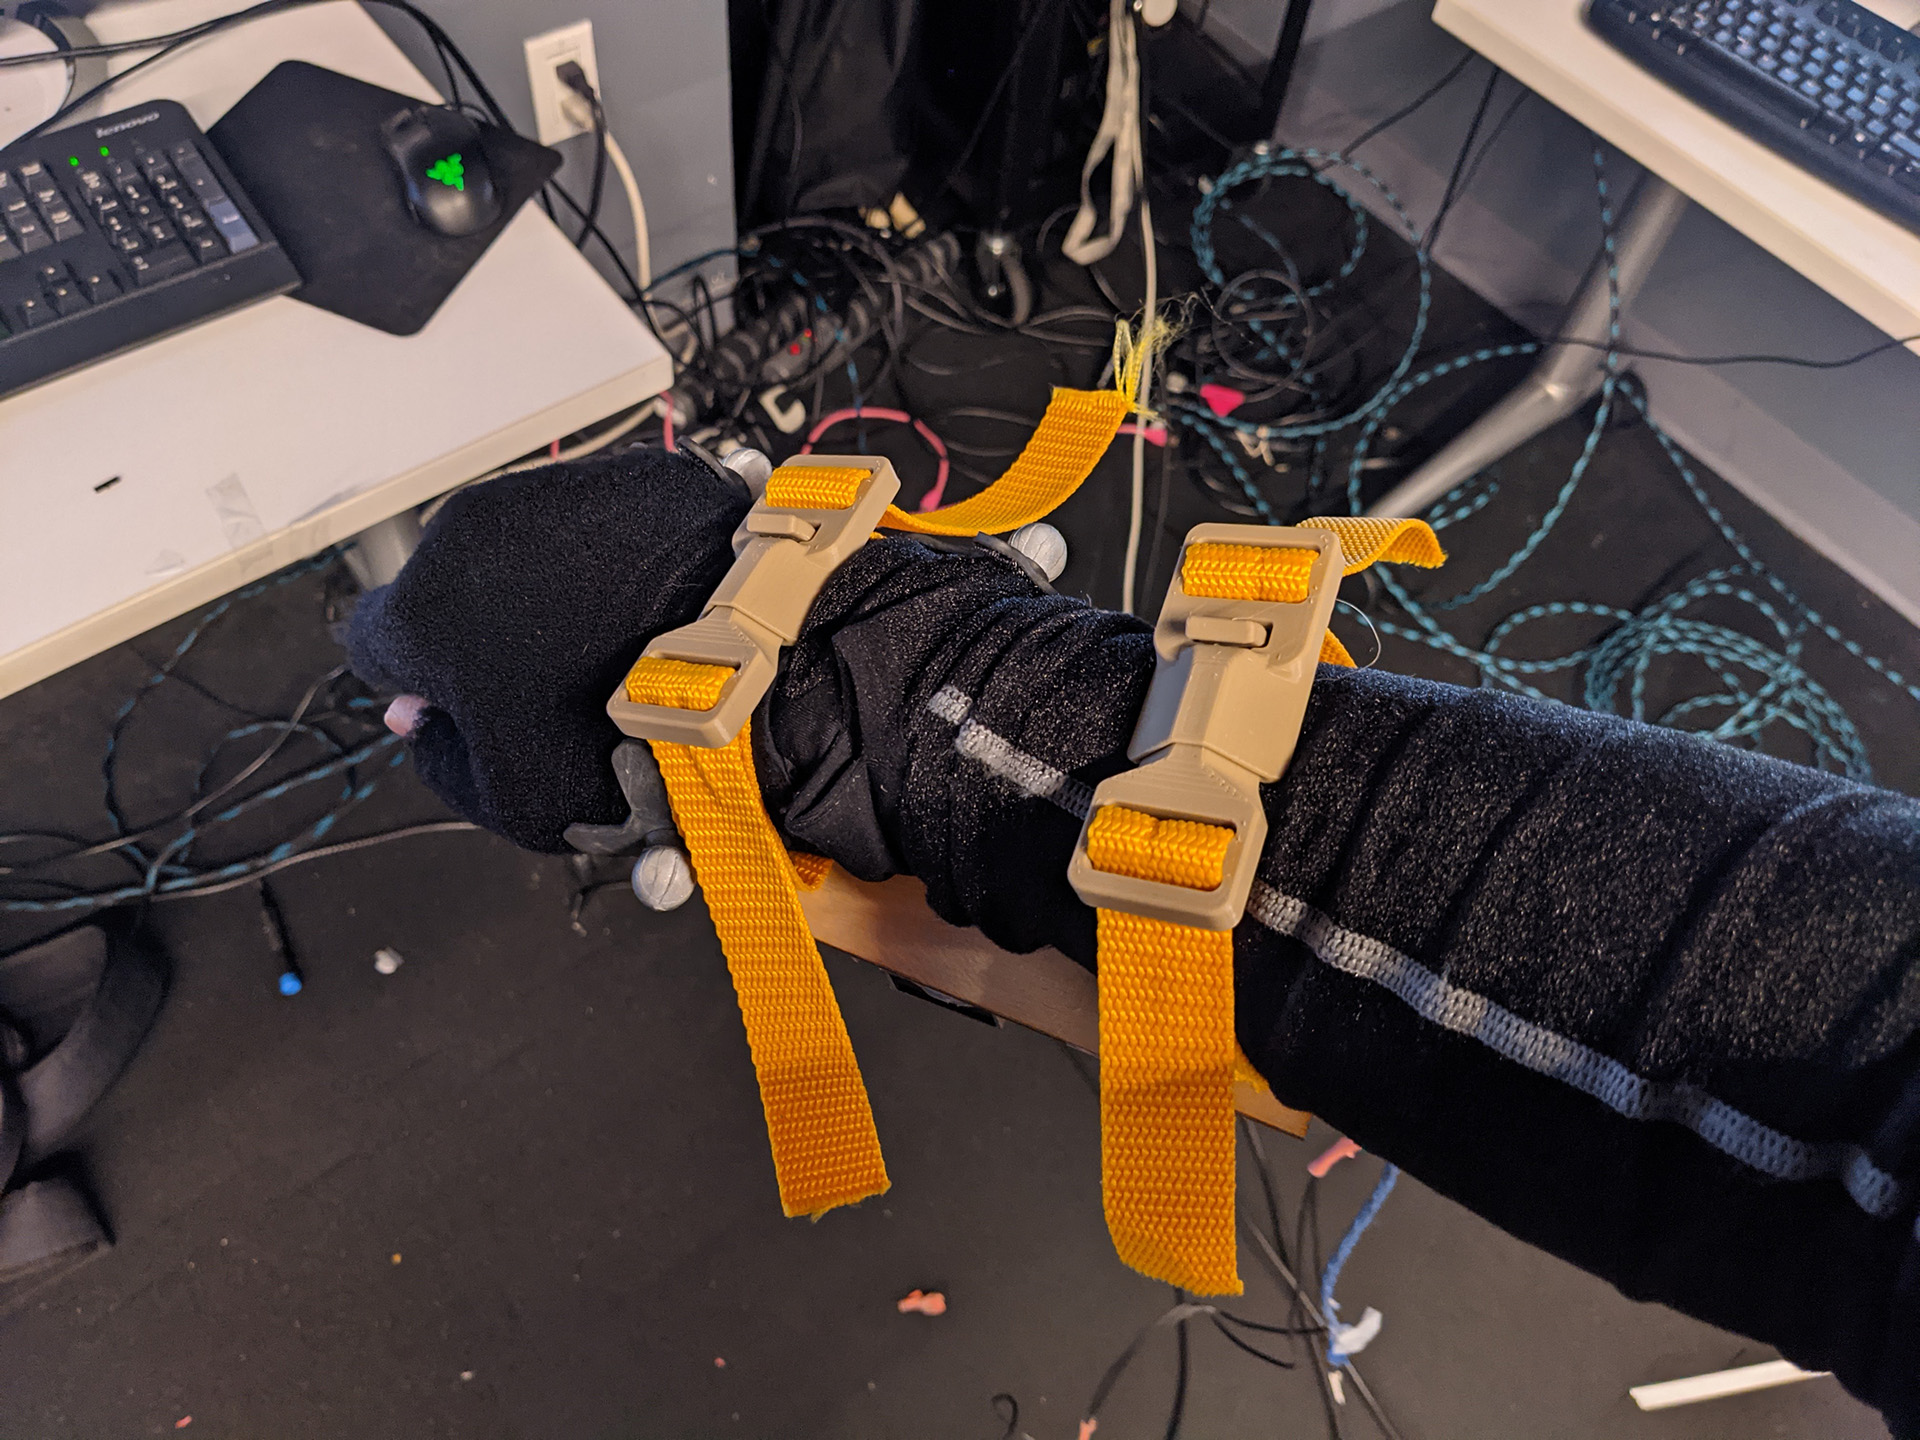
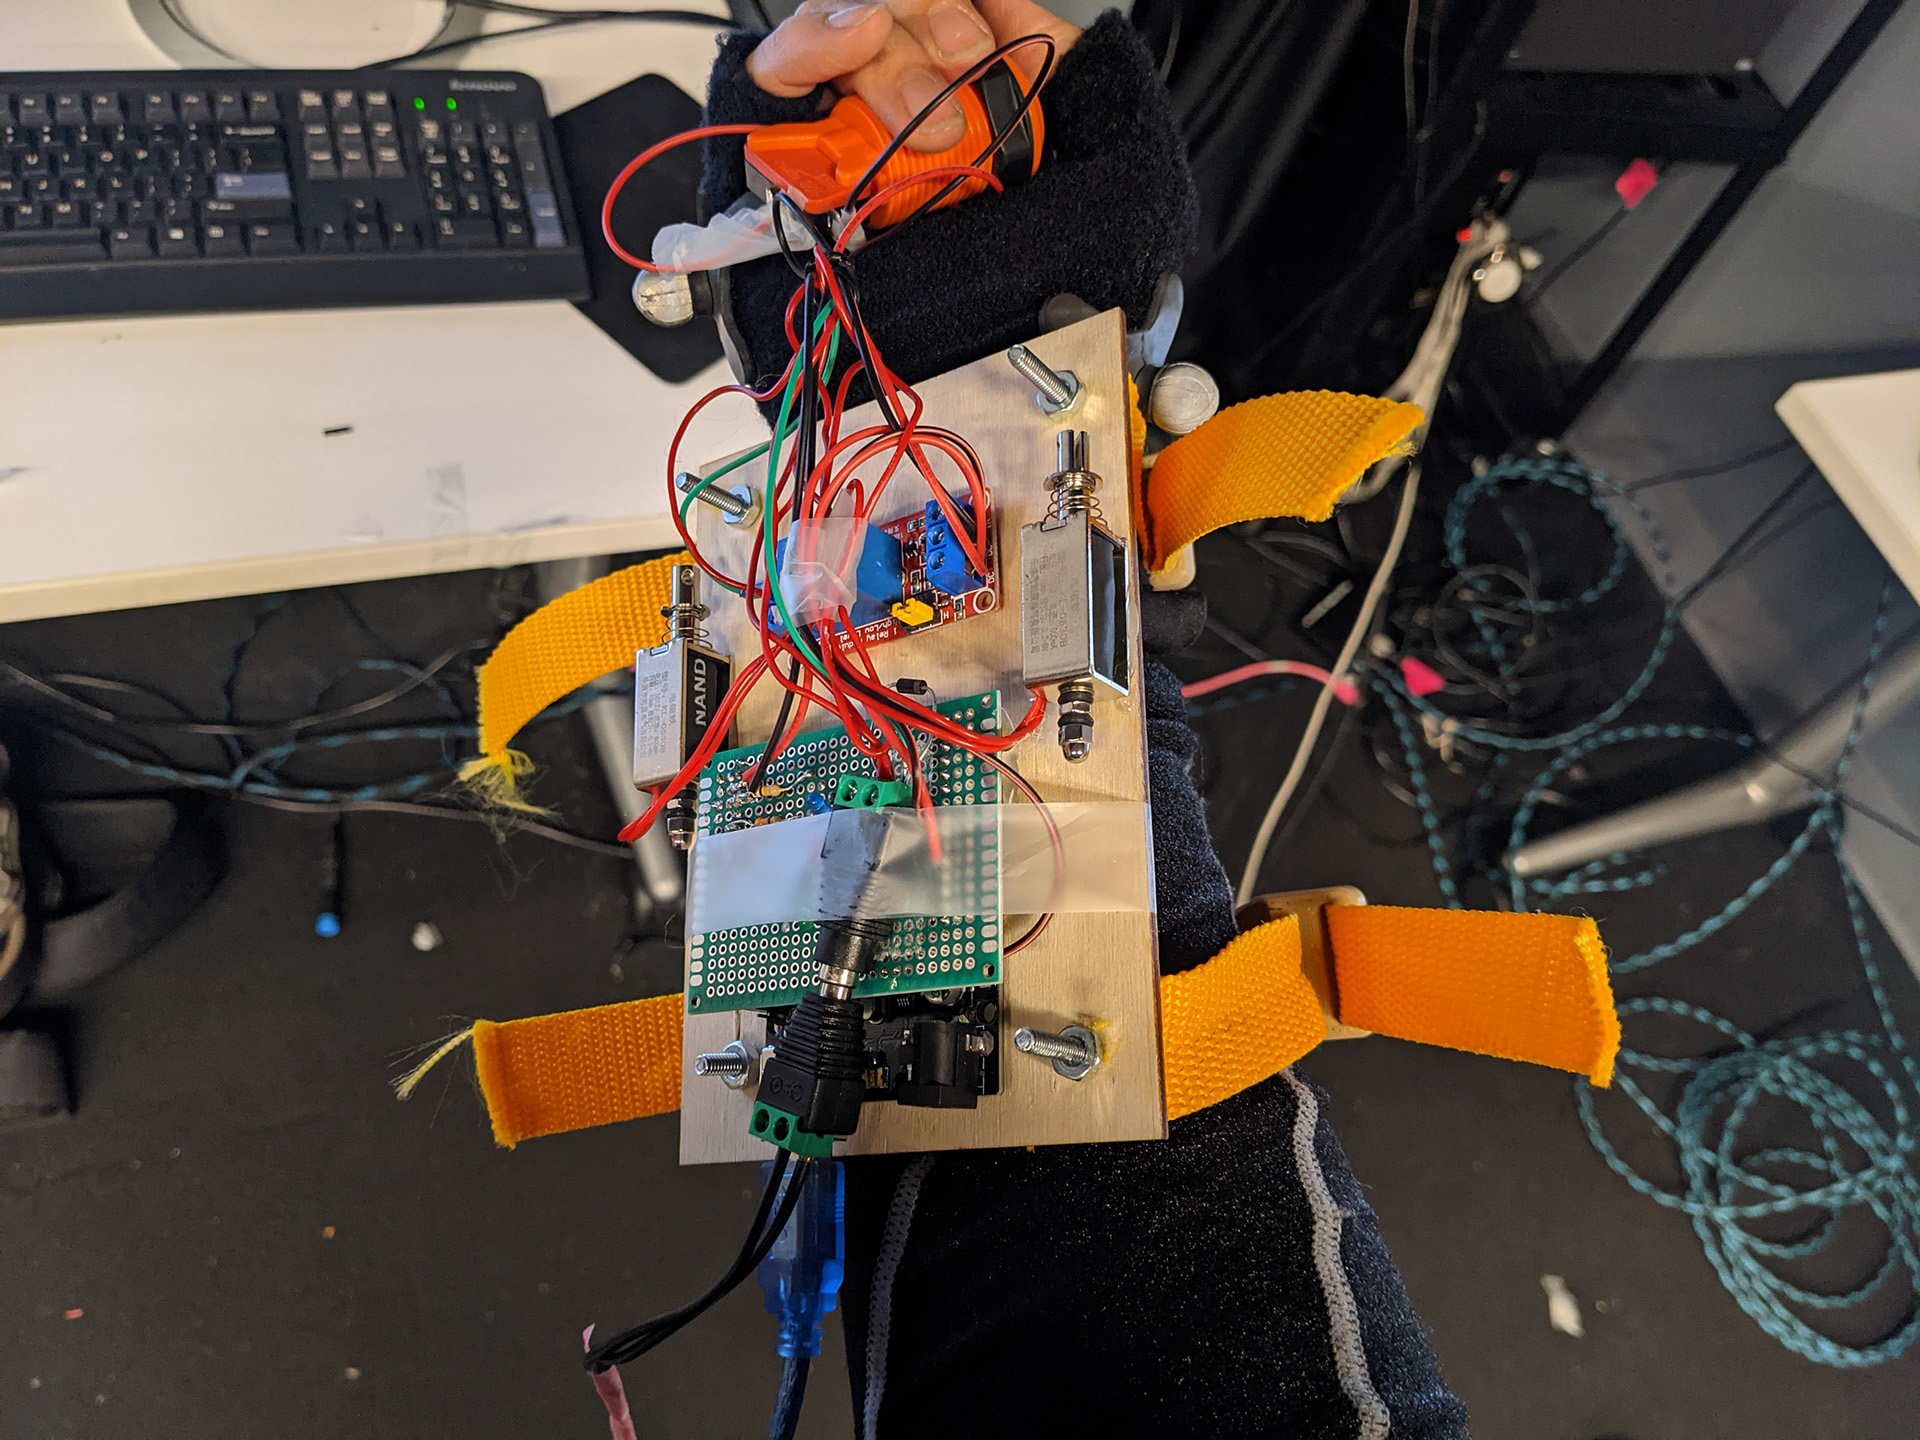 I found a 3D print file for some strap buckles and had those print out on my printer https://www.thingiverse.com/thing:2814683 which worked way better
than I thought it would. Then I did some very rough wire management with some tape I found laying around the IDM Black Box Therater.
I found a 3D print file for some strap buckles and had those print out on my printer https://www.thingiverse.com/thing:2814683 which worked way better
than I thought it would. Then I did some very rough wire management with some tape I found laying around the IDM Black Box Therater.
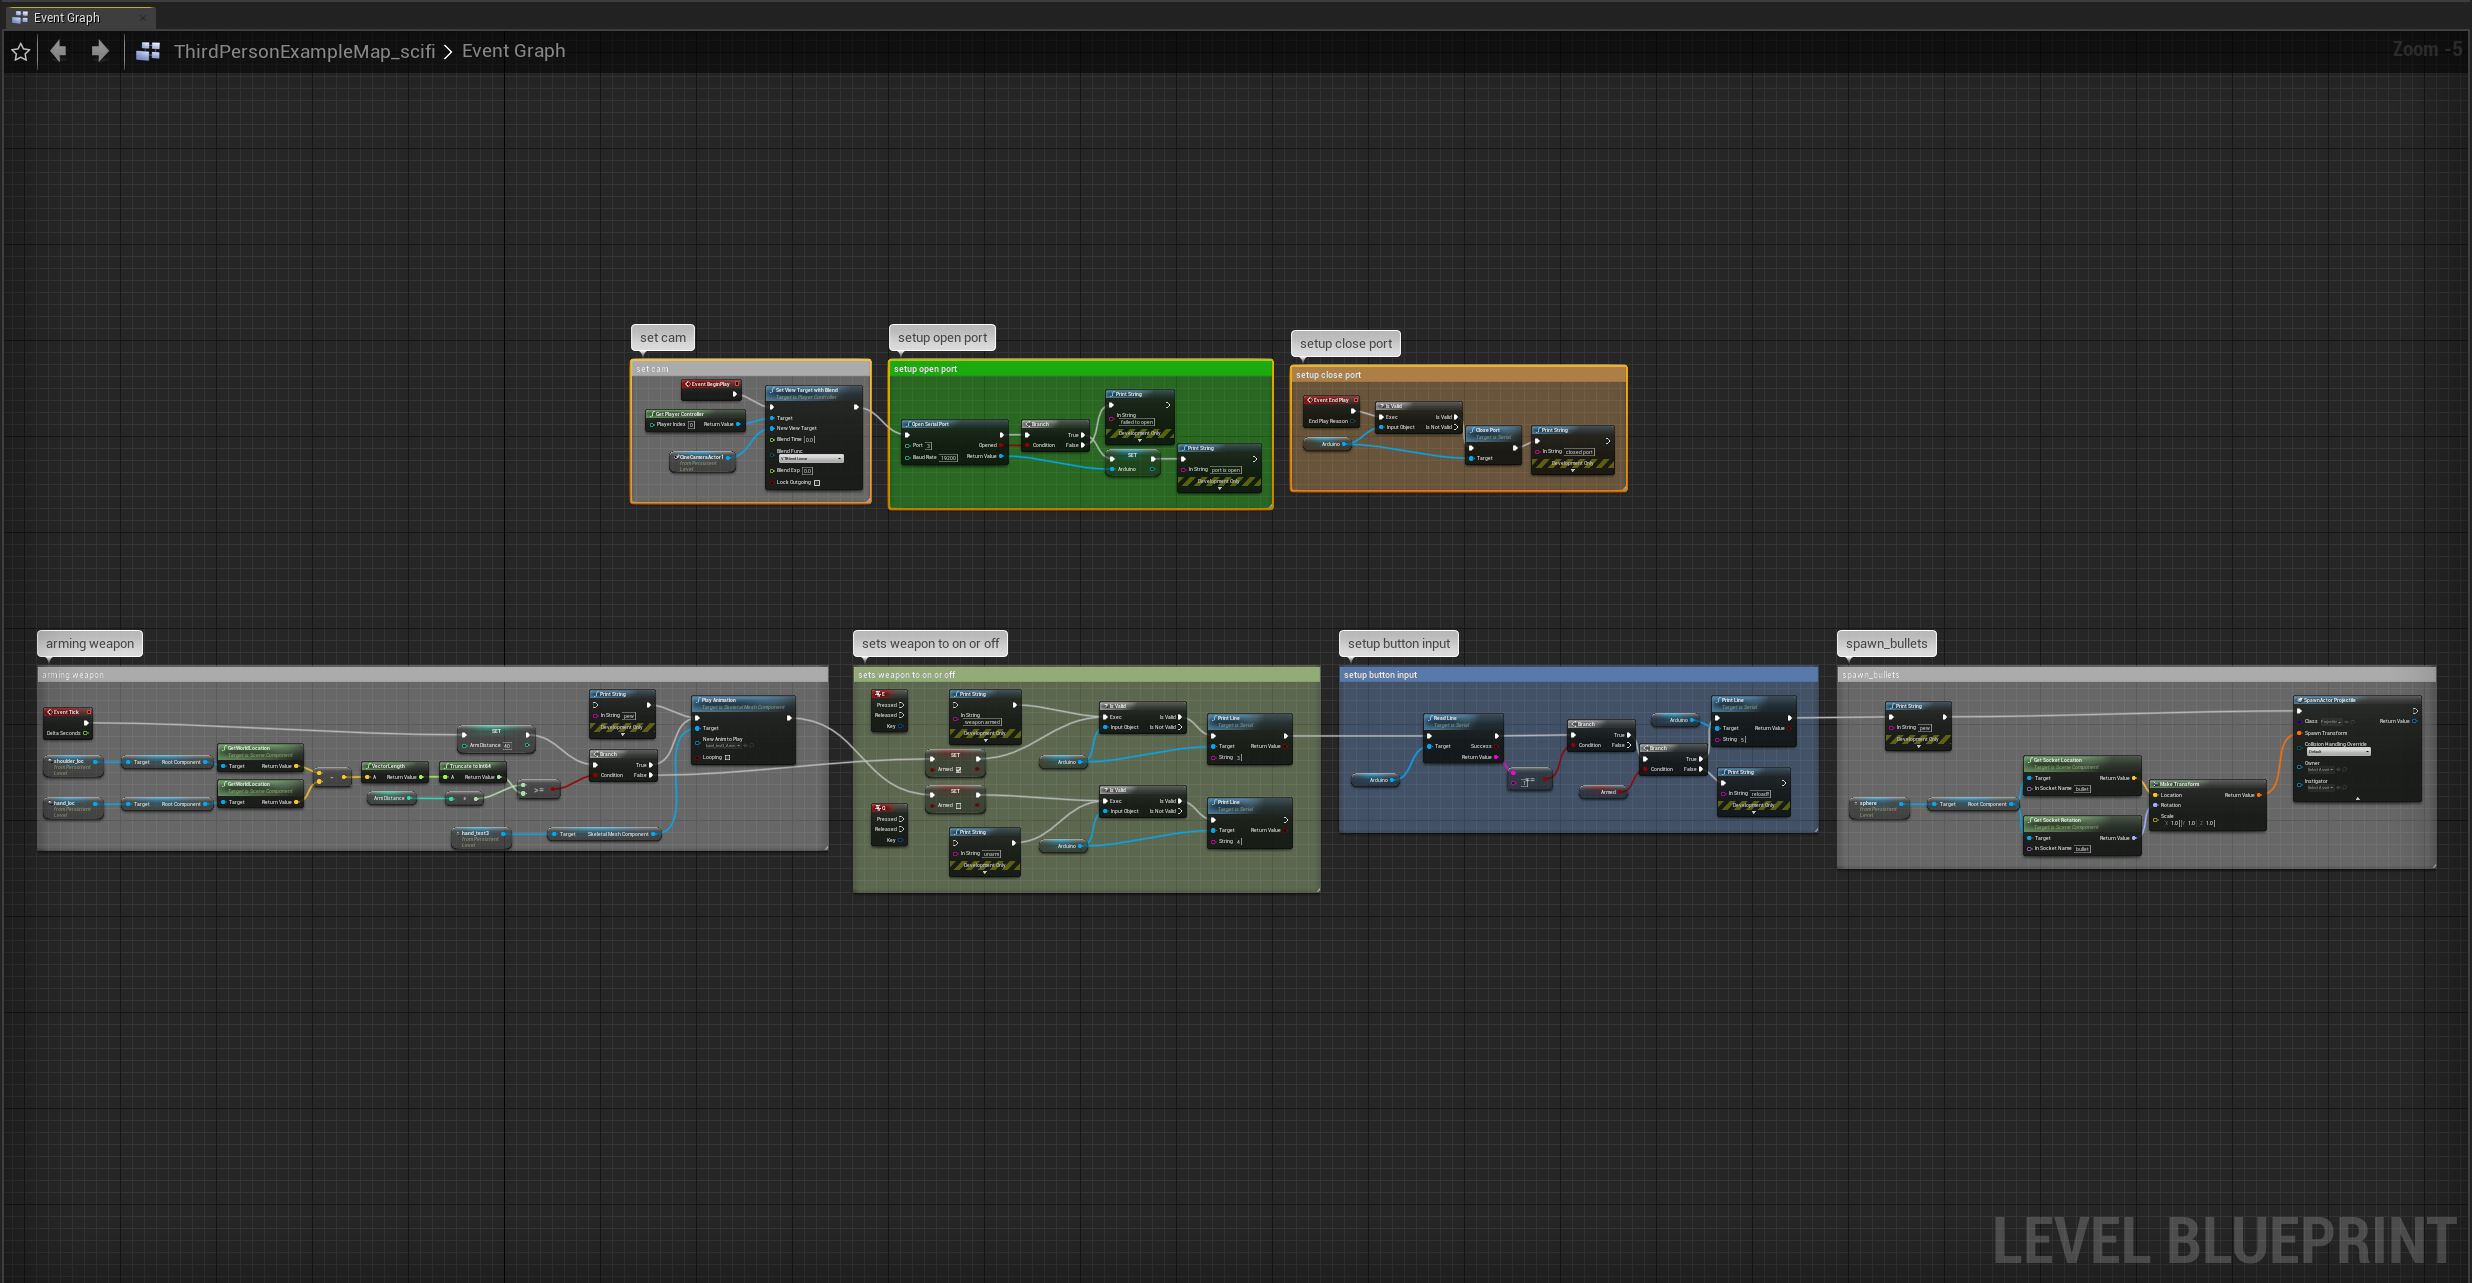
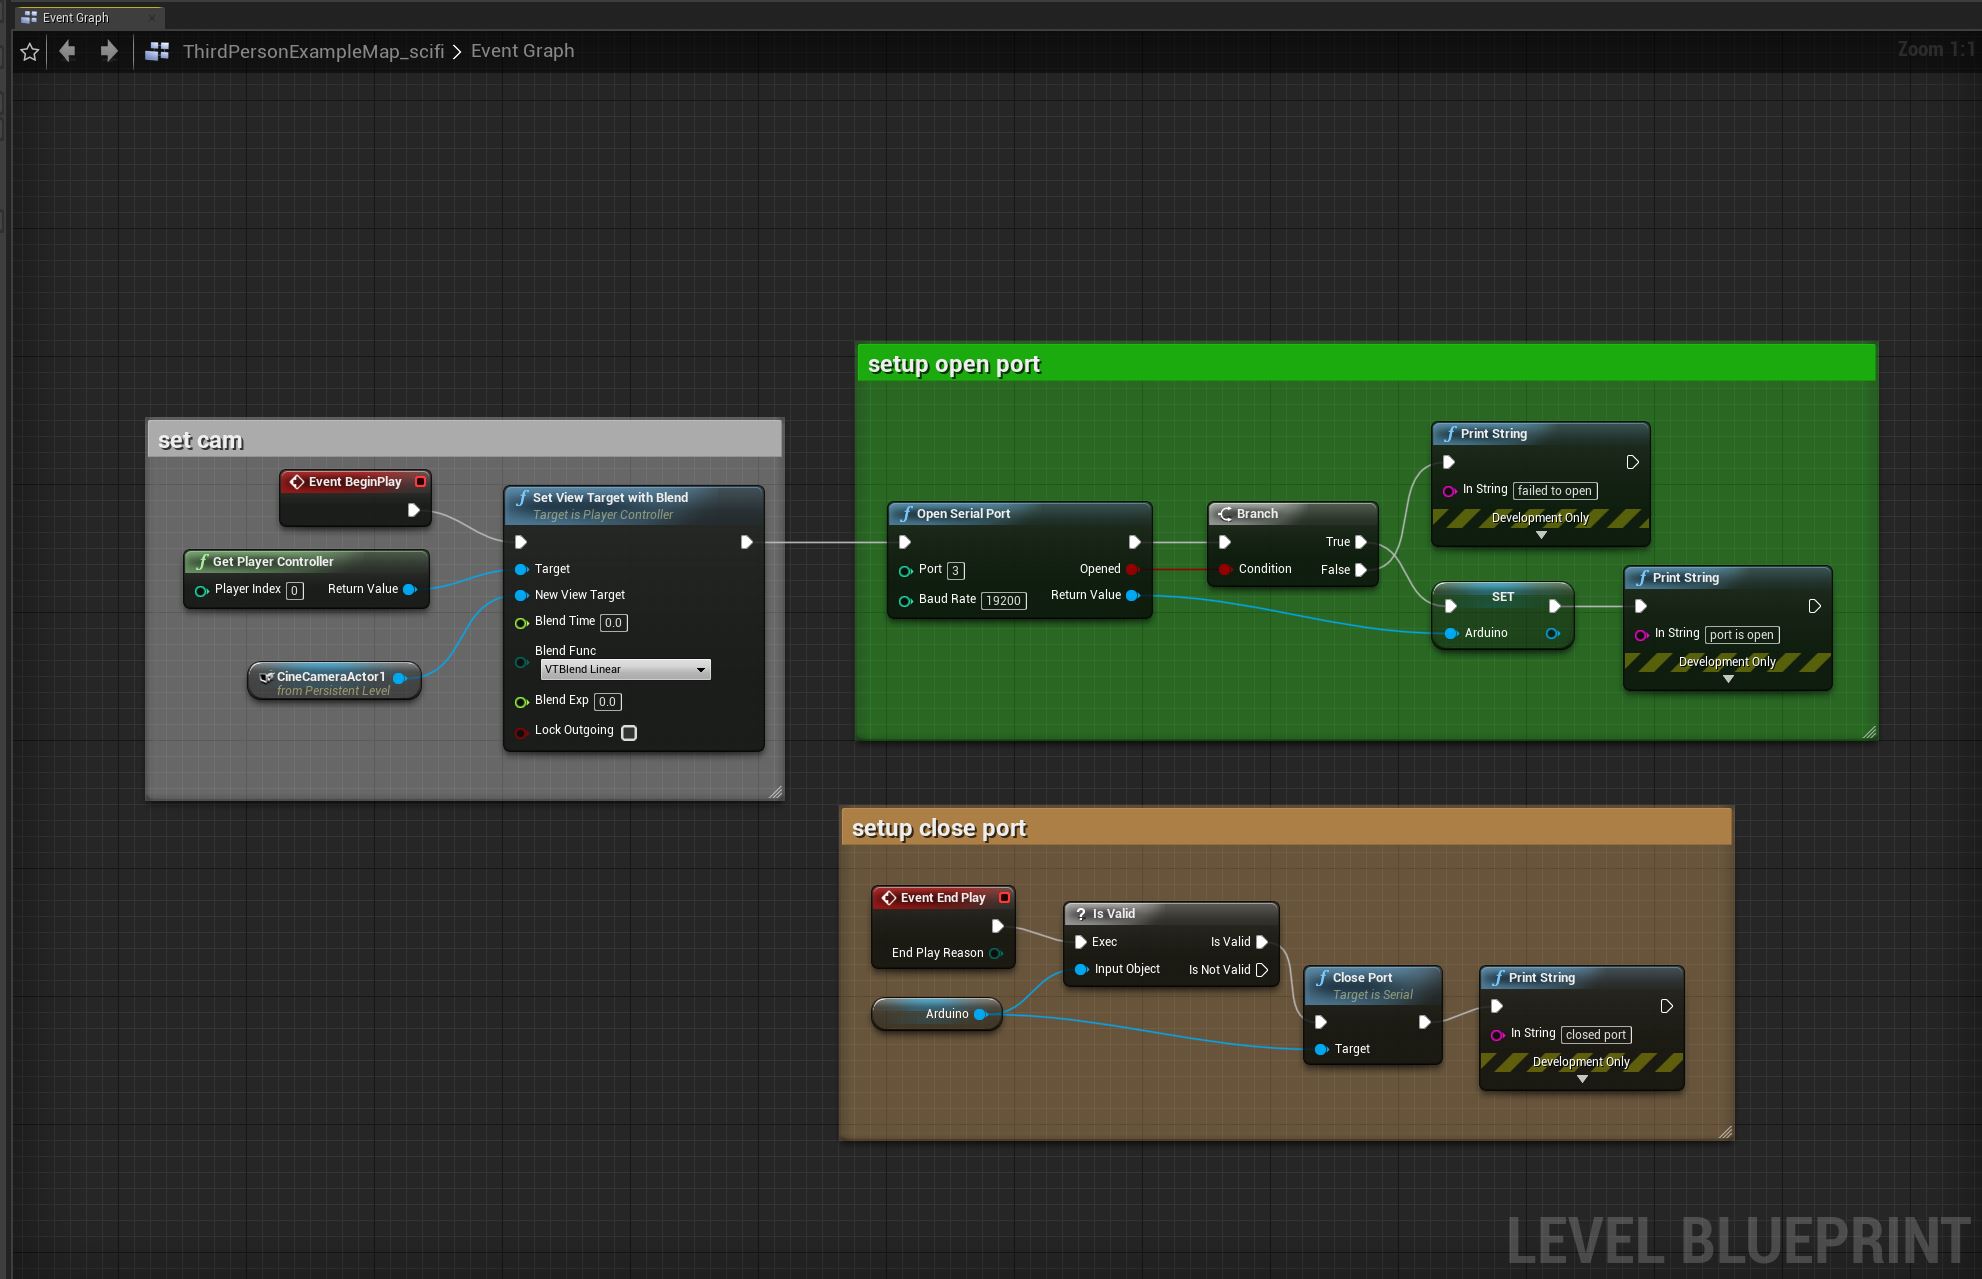 For coding in UE4 using their blueprints system, a lot of the p5js coding knowledge came in handy. The first step I had to do was download the plugin for Arduino to work with UE4, https://github.com/RVillani/UE4Duino. After that, I had to enable the serial port to open when the level turned on,
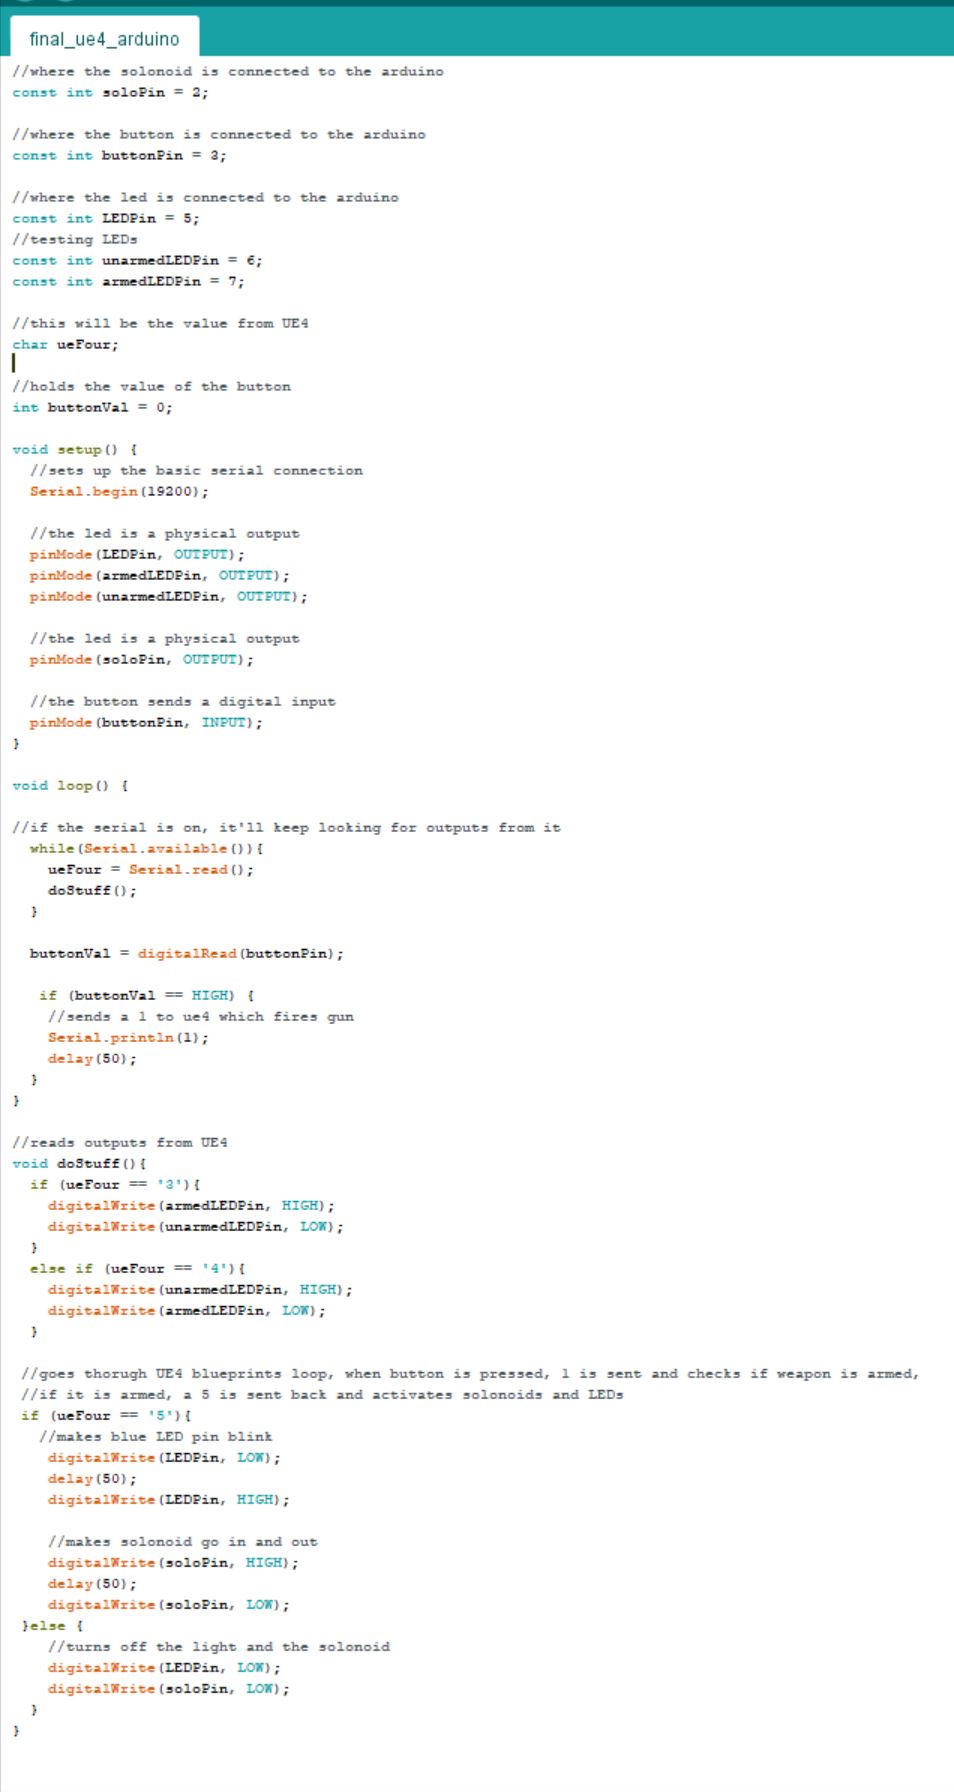
A message I setup would tell me if the port was successful or not. The baud rate was increased to 19200 based on a recommendation and the port was 3. When the level was turned off
I had the port close if you don't do this you would need to unplug the Arduino each time.
For coding in UE4 using their blueprints system, a lot of the p5js coding knowledge came in handy. The first step I had to do was download the plugin for Arduino to work with UE4, https://github.com/RVillani/UE4Duino. After that, I had to enable the serial port to open when the level turned on,
A message I setup would tell me if the port was successful or not. The baud rate was increased to 19200 based on a recommendation and the port was 3. When the level was turned off
I had the port close if you don't do this you would need to unplug the Arduino each time.
 I had Arduino send signals to UE4 working first which is the result here. This part was a pretty nice milestone since the button would make the solenoids go off but I wanted to go beyond that and have the machine send messages back and forth between themselves. I had an arming and disarming setup where you had to press a button to tell the engine if it was
okay to shoot or not. With only one way signals, the solenoids would go off no matter what.
I had Arduino send signals to UE4 working first which is the result here. This part was a pretty nice milestone since the button would make the solenoids go off but I wanted to go beyond that and have the machine send messages back and forth between themselves. I had an arming and disarming setup where you had to press a button to tell the engine if it was
okay to shoot or not. With only one way signals, the solenoids would go off no matter what.
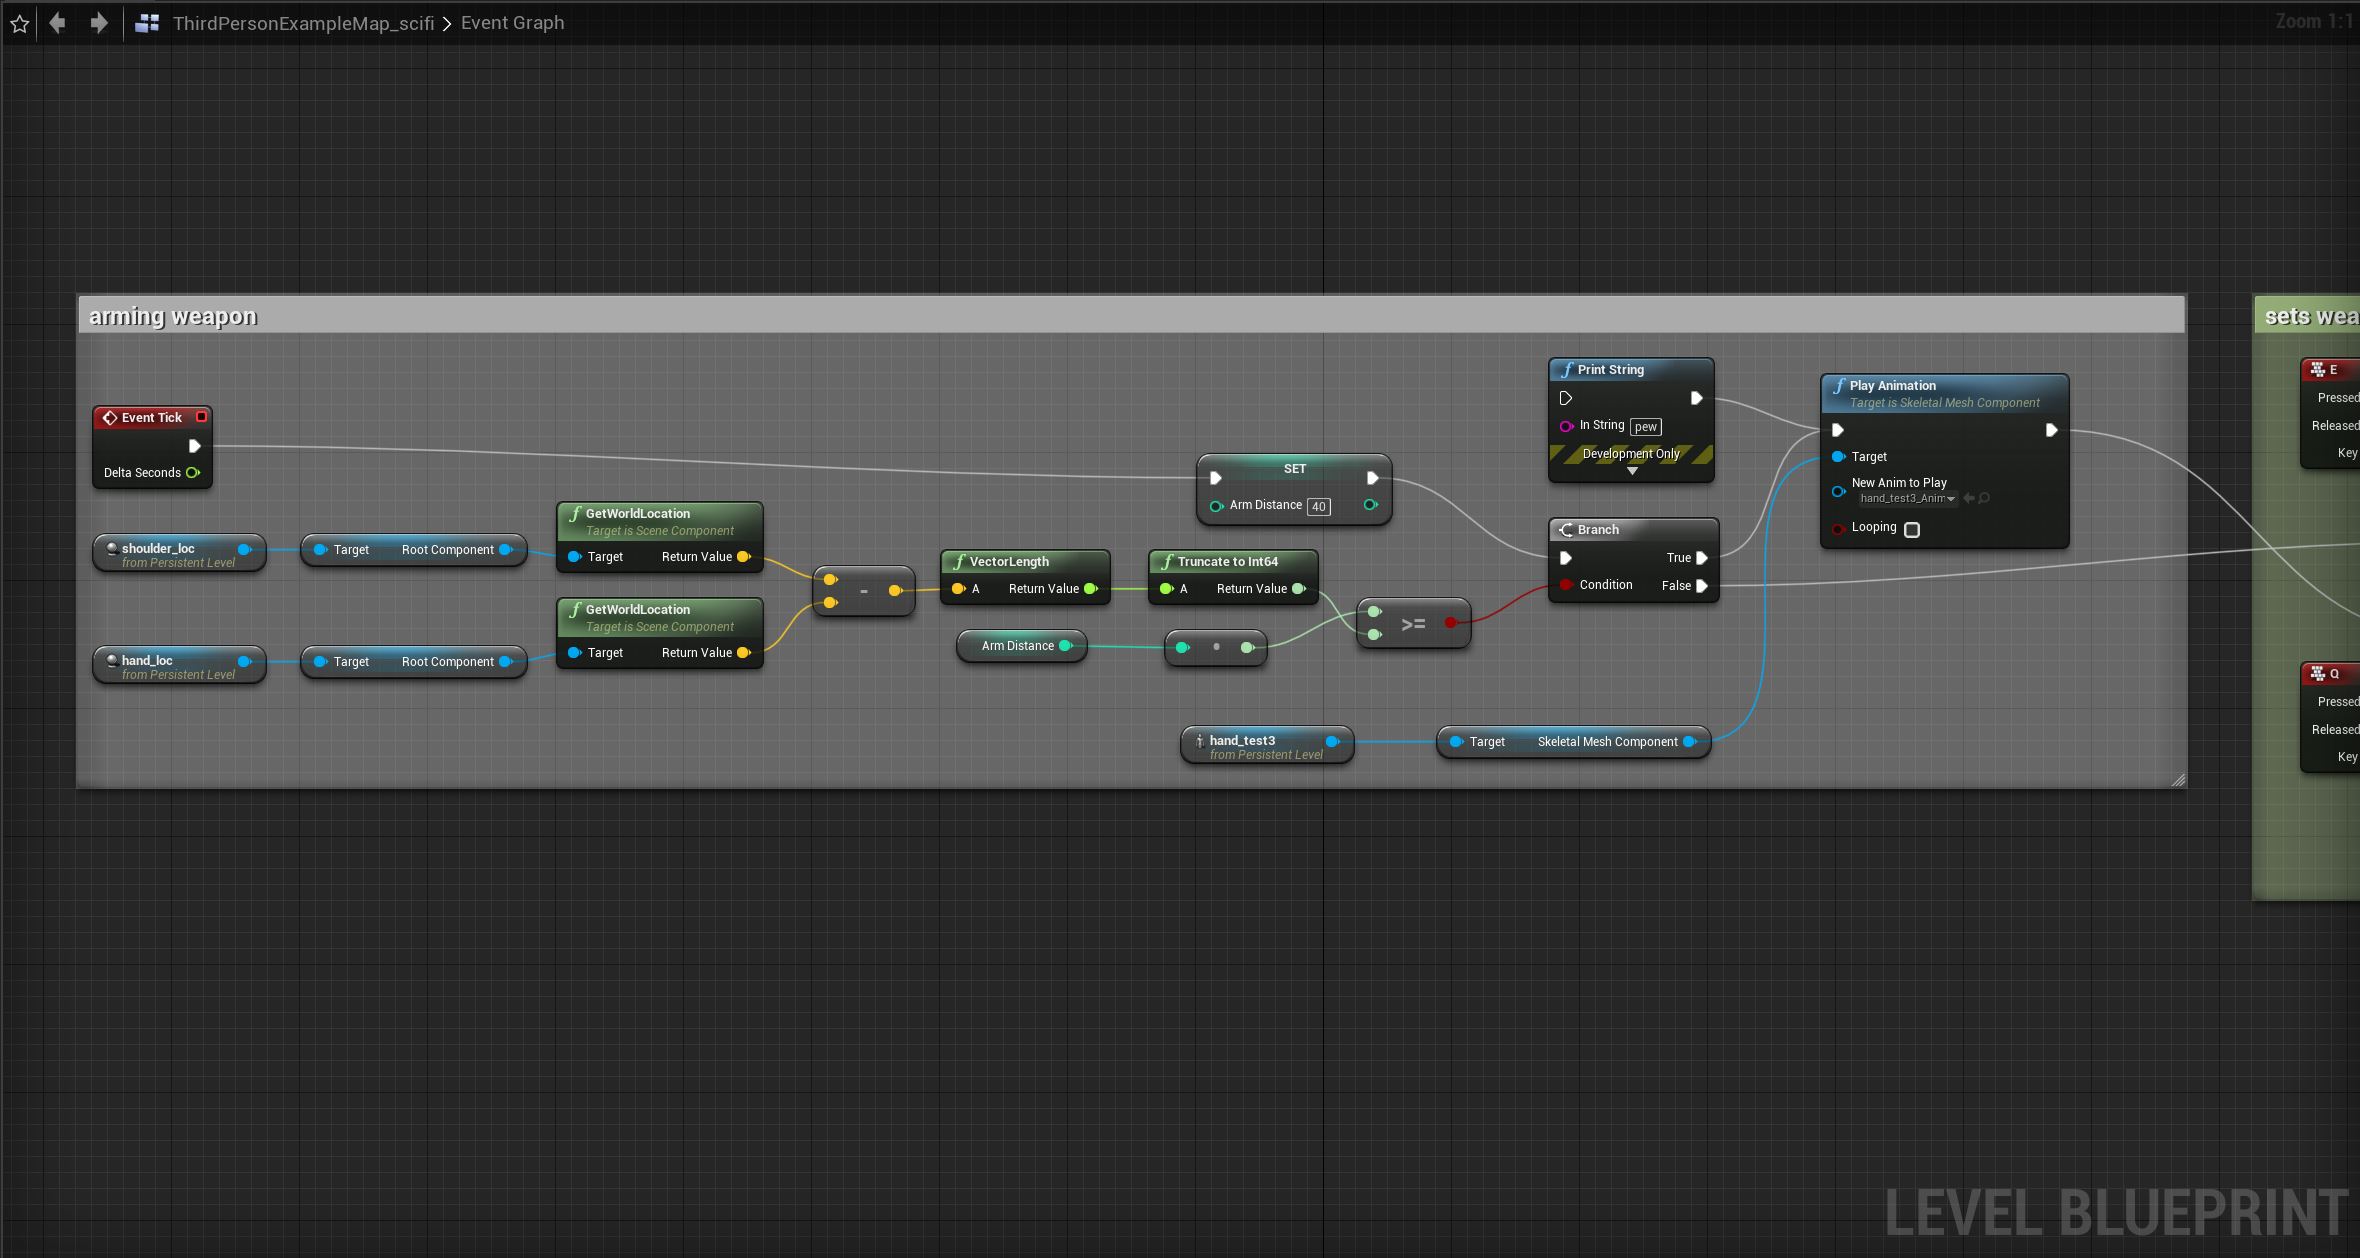 For this part of the code, the Event Tick is like the draw loop in p5js, so every few milisecs it'll loop. I setup objects attached to the character's shoulder and wrist, then I set up an
if statement which is the branch node to see if the vector distance differerence between the two objects is greater than 40 units, if it was true, the animation would play and continue to the next thing.
For this part of the code, the Event Tick is like the draw loop in p5js, so every few milisecs it'll loop. I setup objects attached to the character's shoulder and wrist, then I set up an
if statement which is the branch node to see if the vector distance differerence between the two objects is greater than 40 units, if it was true, the animation would play and continue to the next thing.
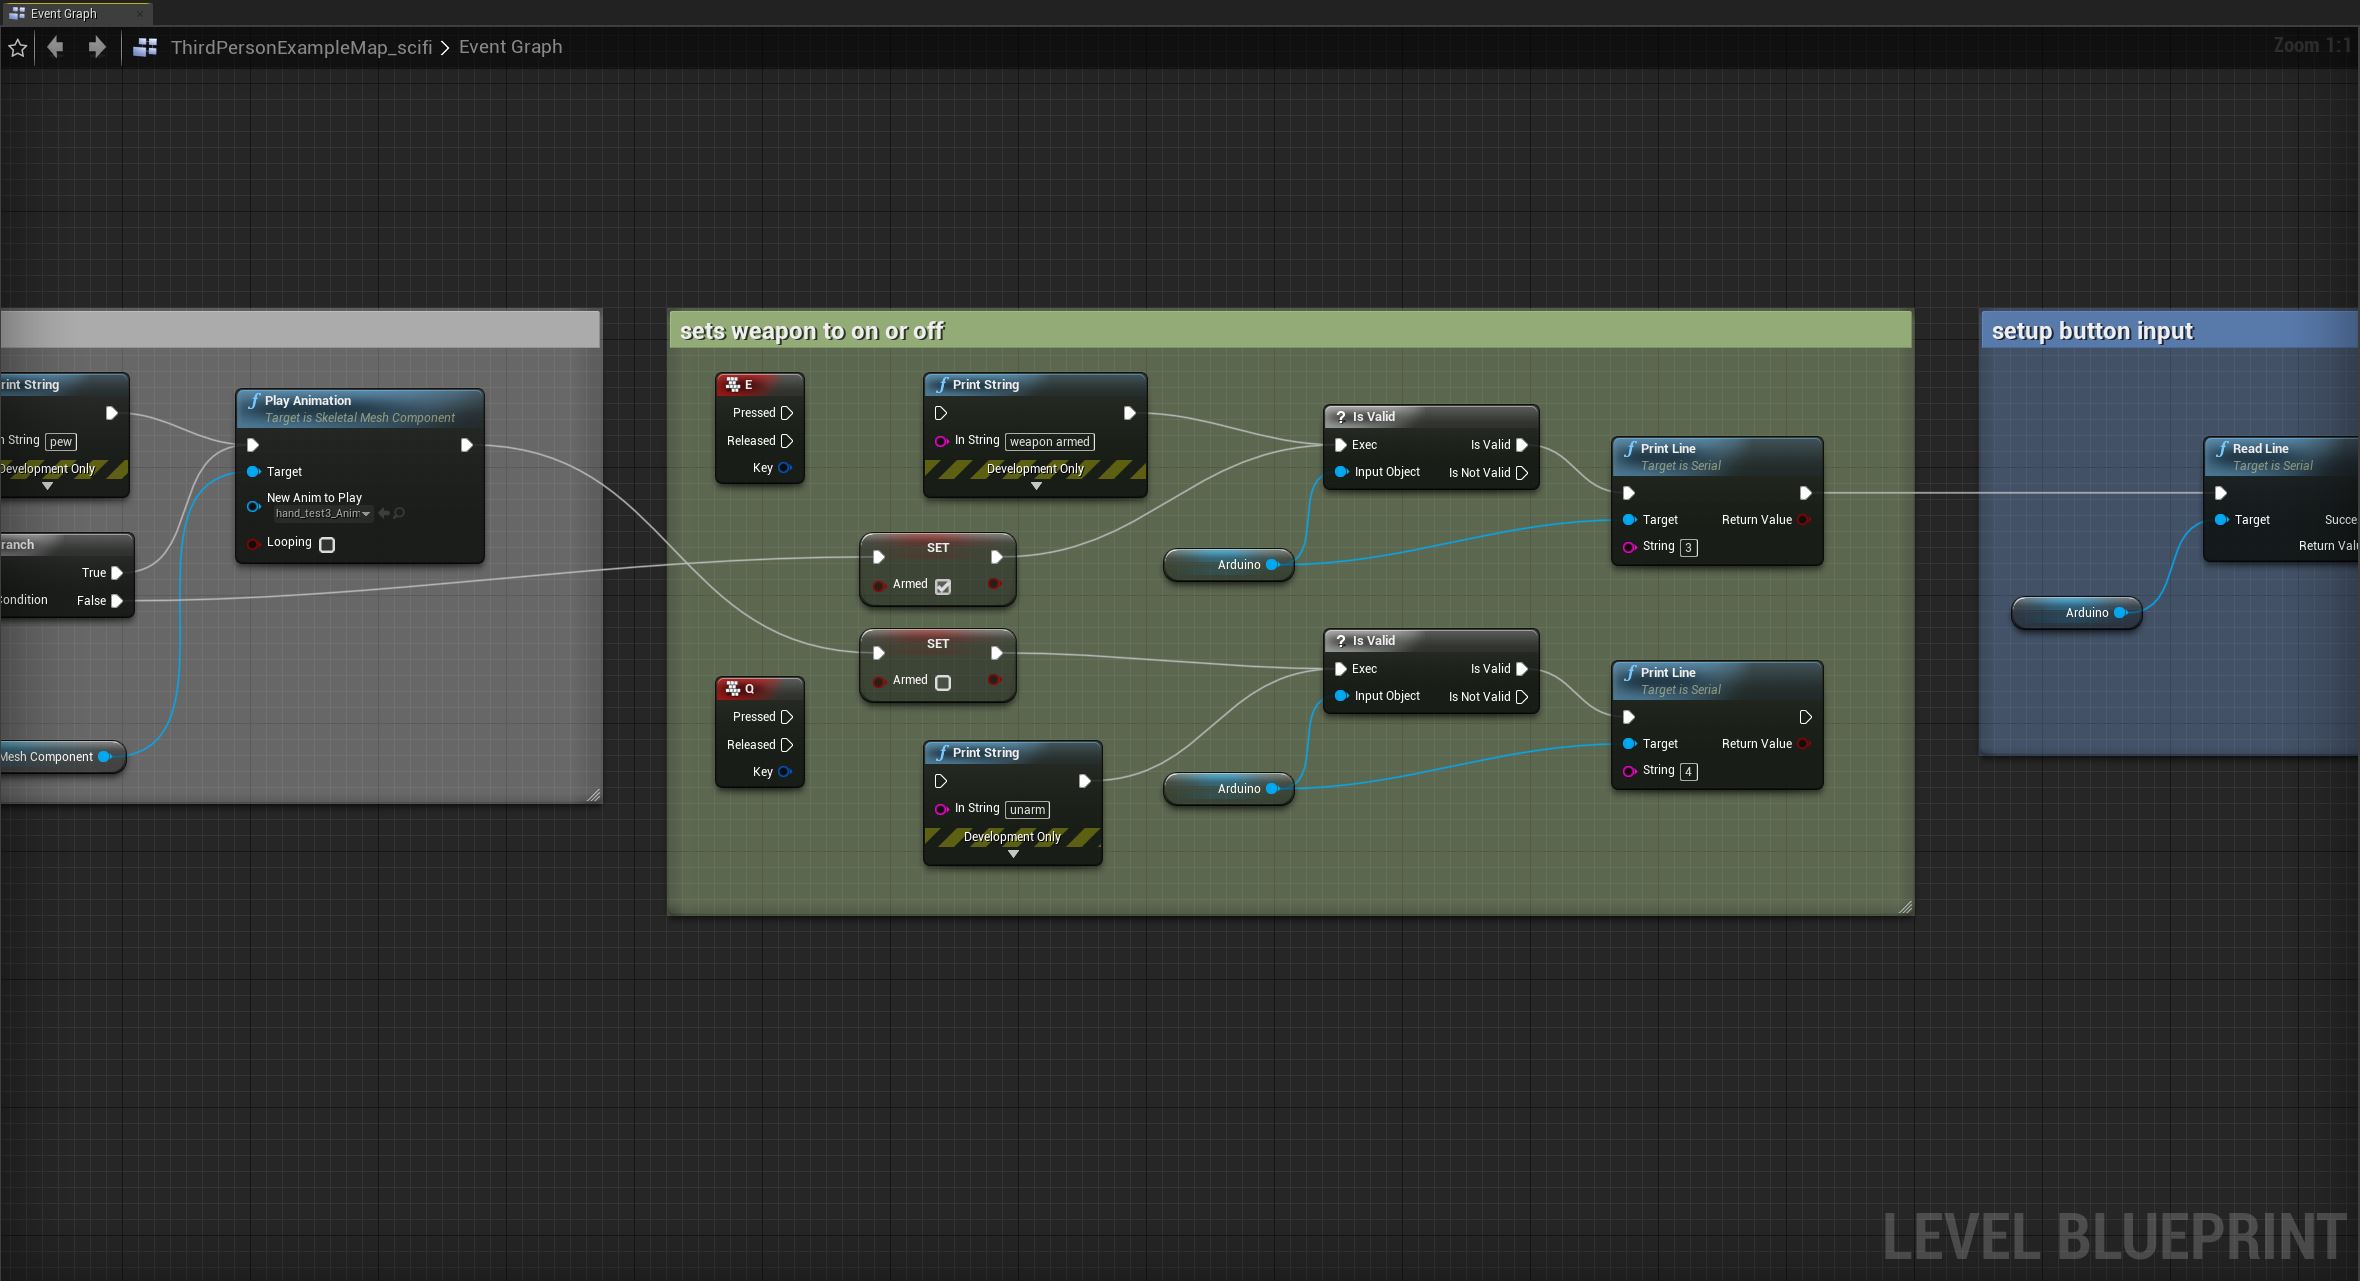 Next I had a boolean, armed, set to true and sent the signal 3 to the arduino code which made the green LED turn on and continued to the next step. If the distance was less than 40 units, the boolean was
set to false and the red LED would turn on and a 4 was sent to the arduino.
Next I had a boolean, armed, set to true and sent the signal 3 to the arduino code which made the green LED turn on and continued to the next step. If the distance was less than 40 units, the boolean was
set to false and the red LED would turn on and a 4 was sent to the arduino.
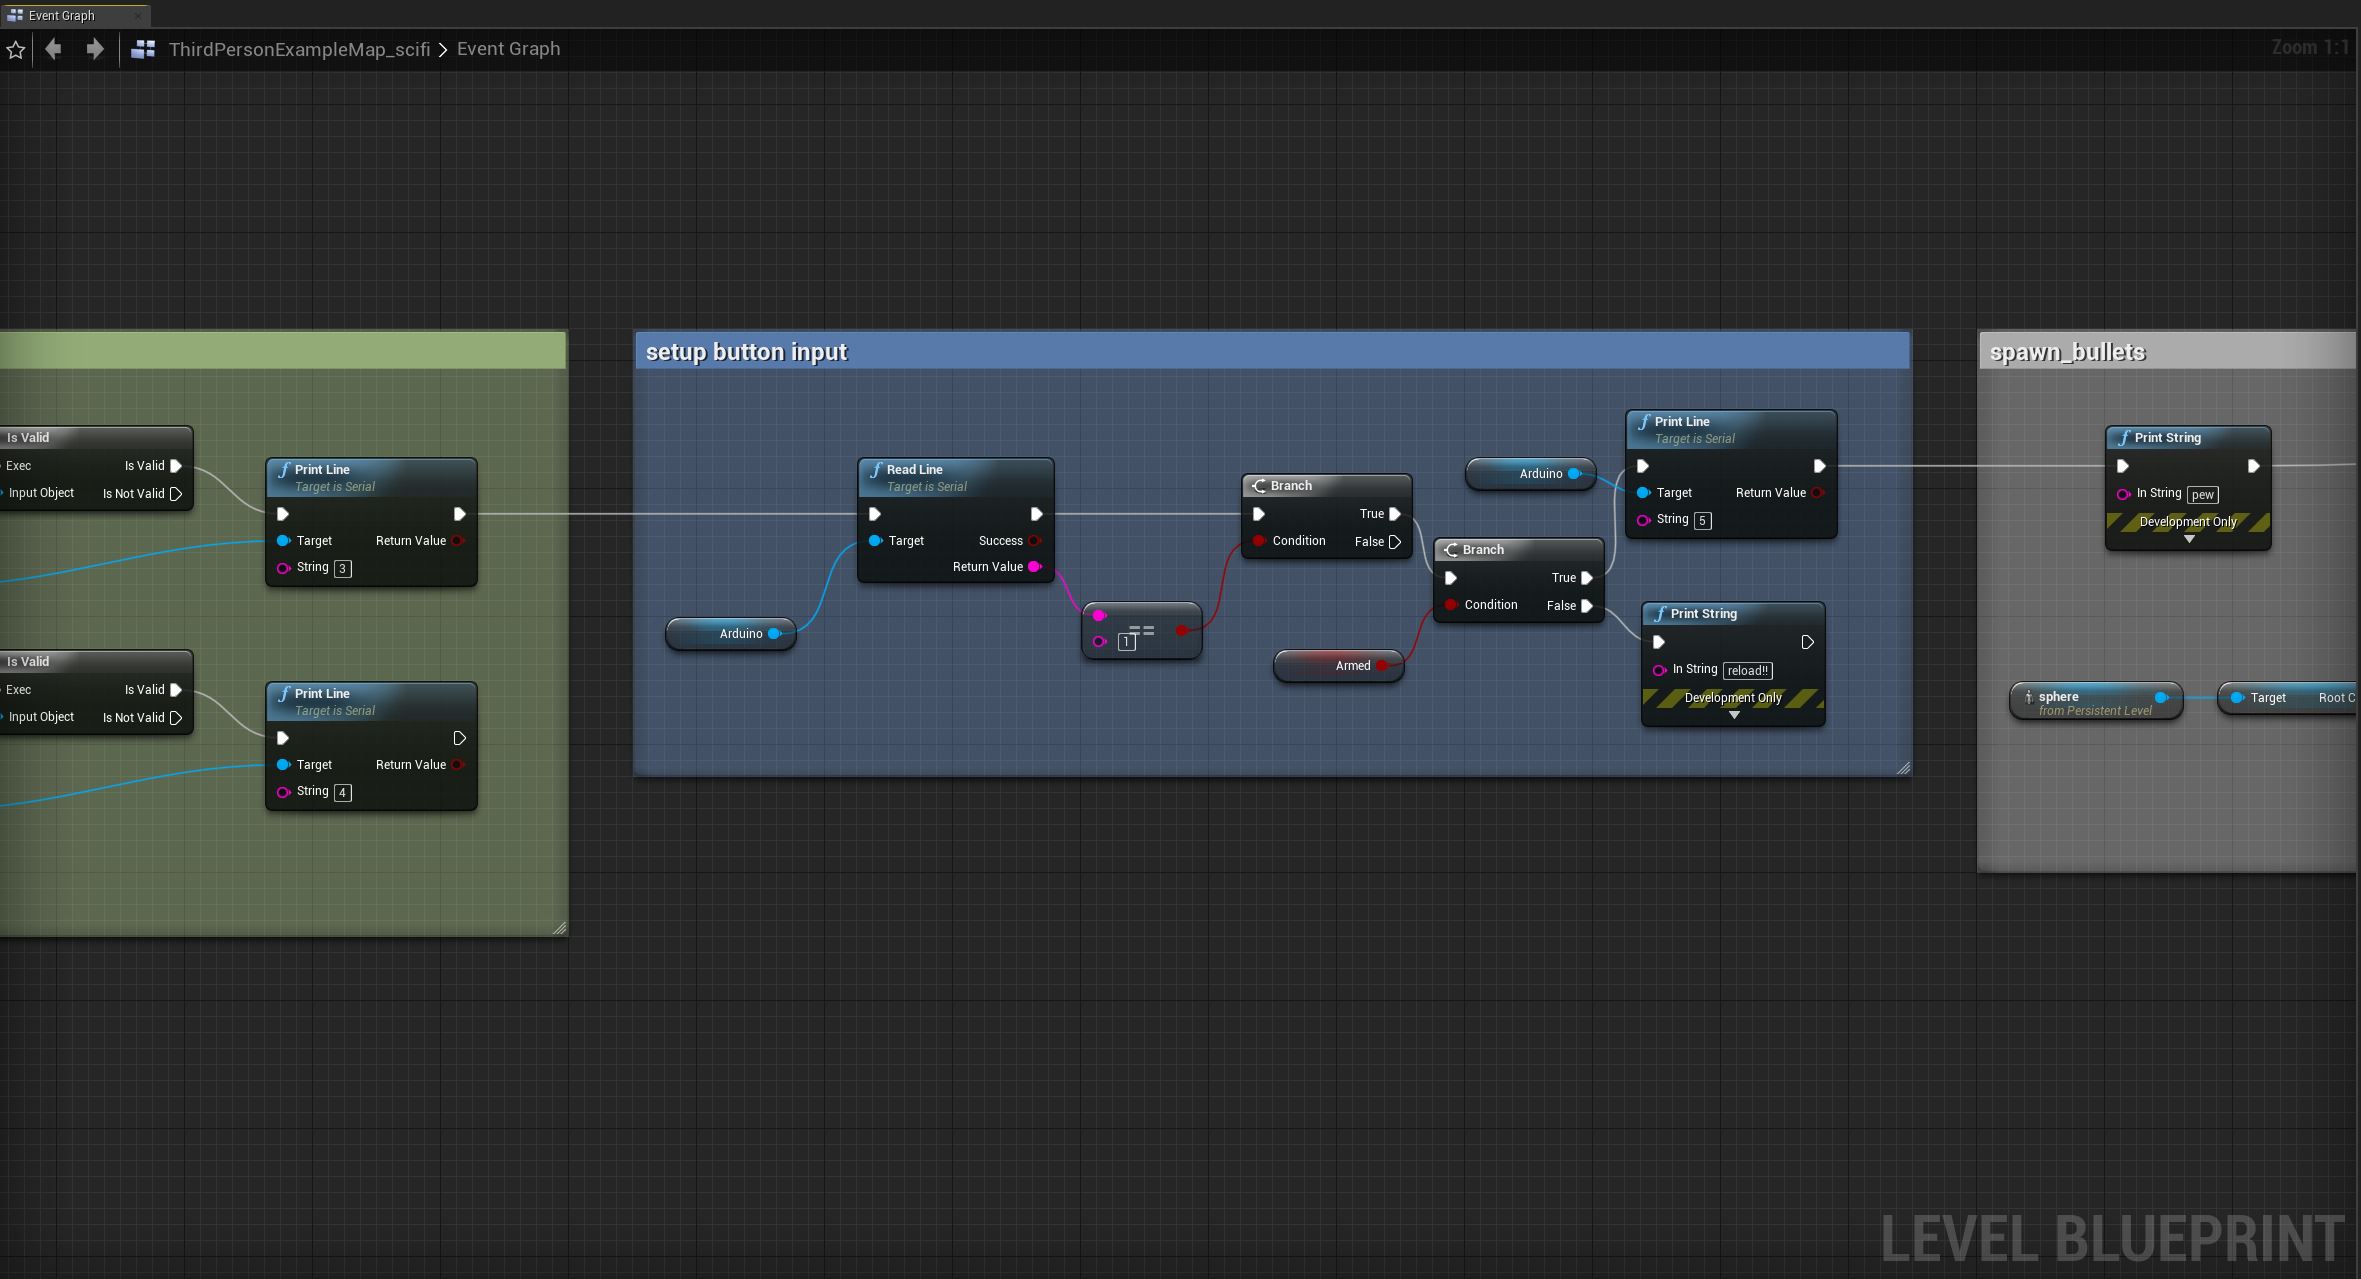 After that if all the things were true, UE4 would look for the 1 signal from arduino when the button was pressed and when it was pressed, UE4 would send a signal 5 back to ardunio telling it to pulse
the solonoids.
After that if all the things were true, UE4 would look for the 1 signal from arduino when the button was pressed and when it was pressed, UE4 would send a signal 5 back to ardunio telling it to pulse
the solonoids.
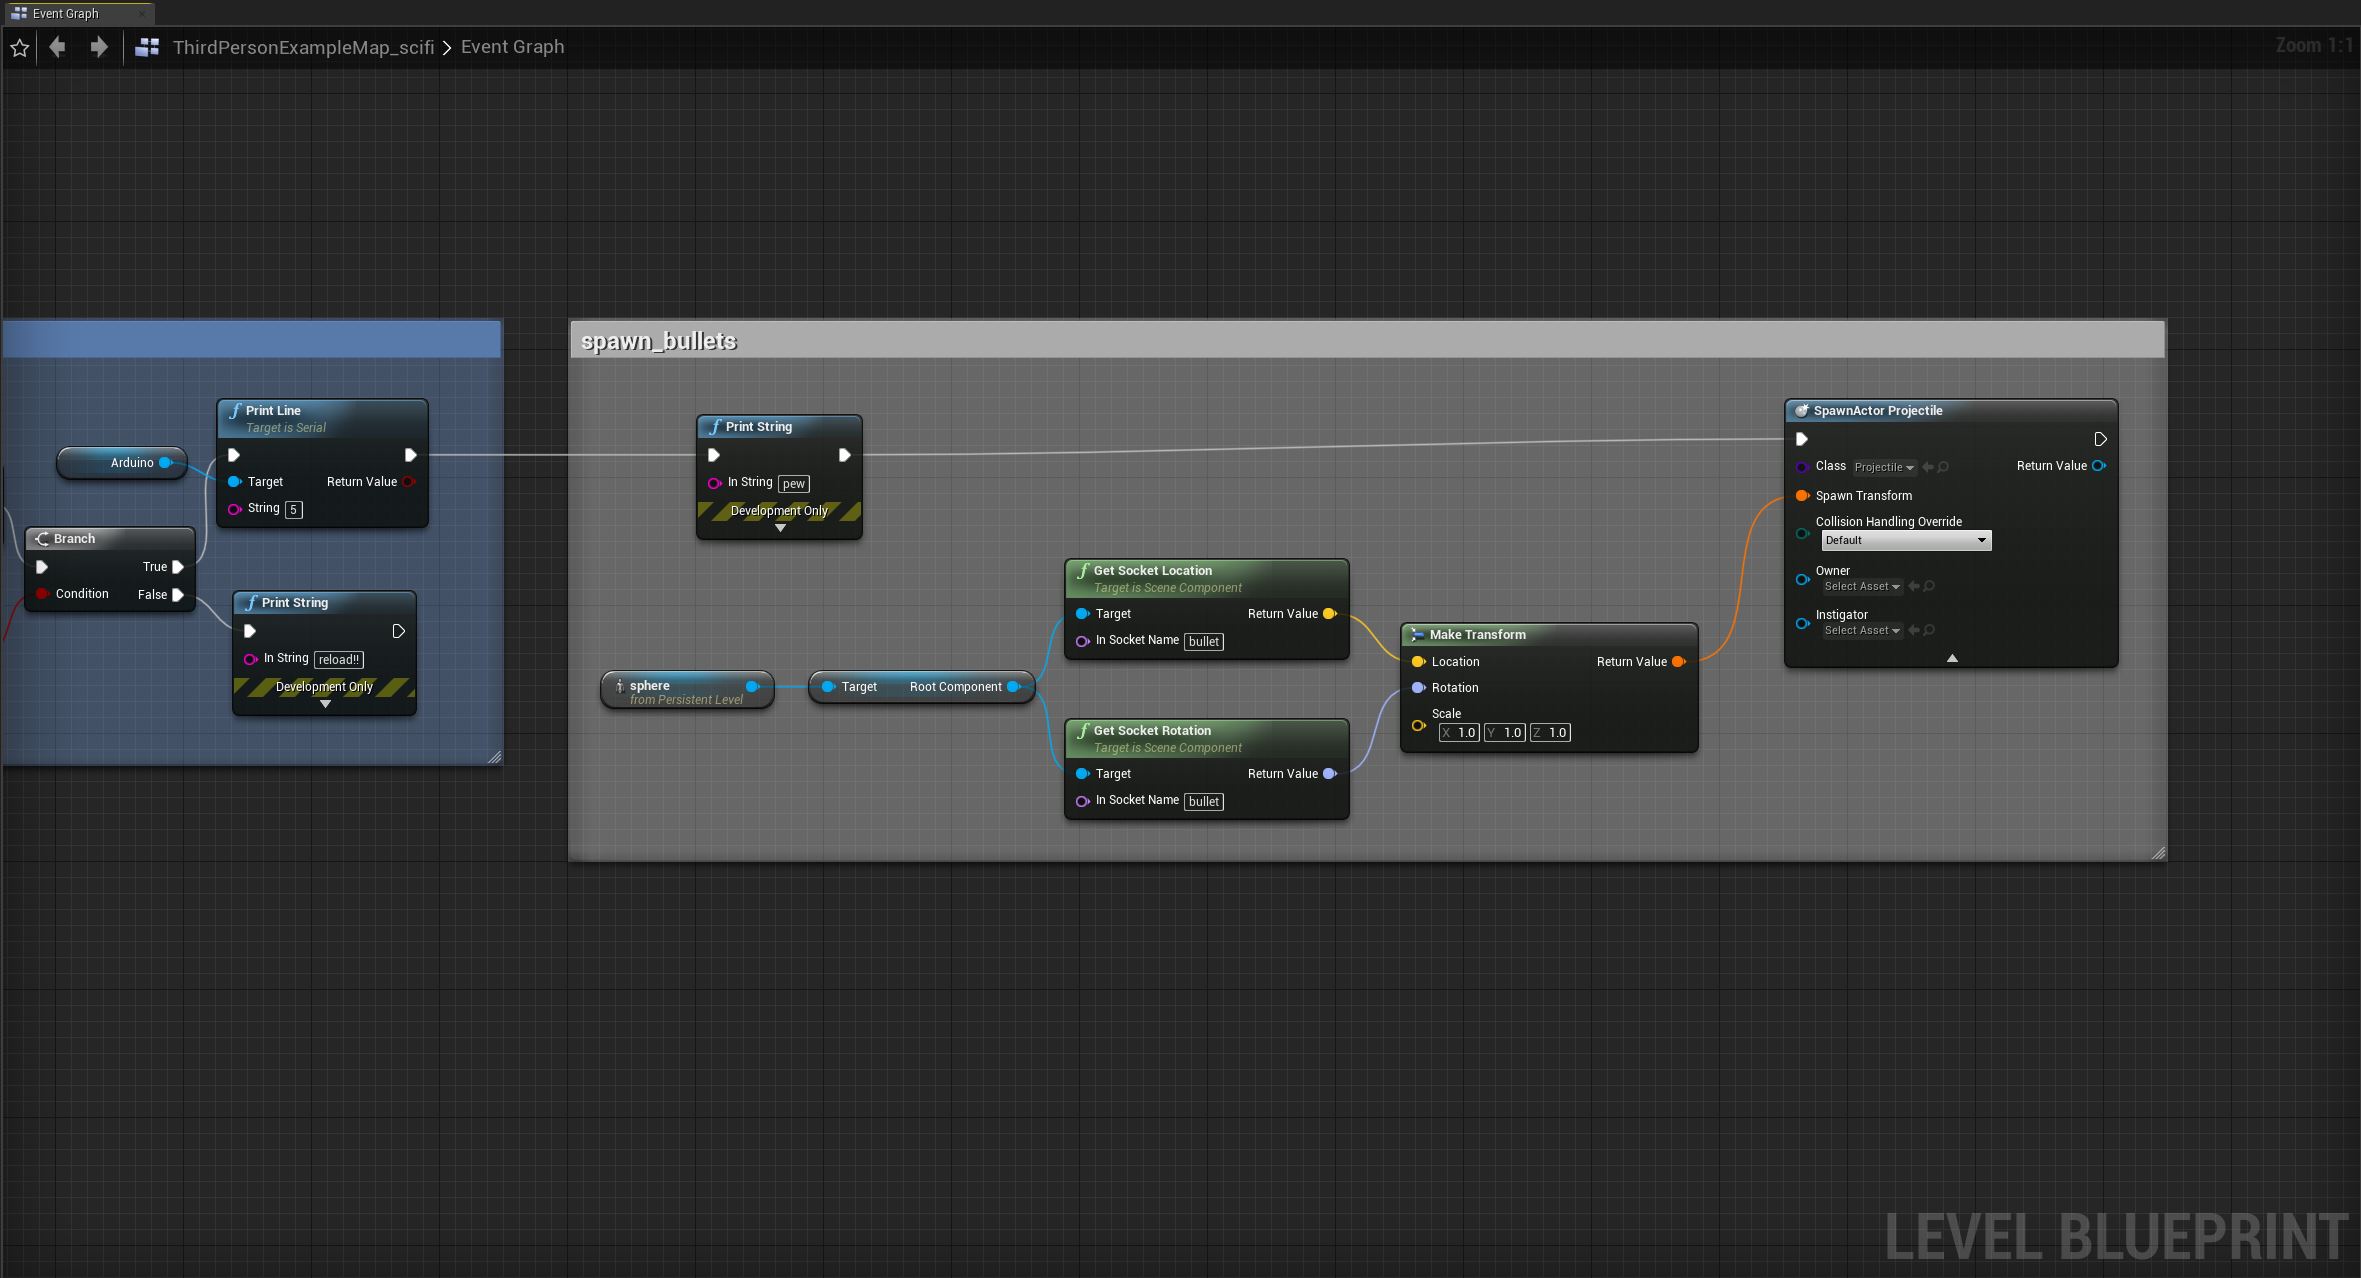 Lastly the blue plasma bullets I setup would spawn from arm cannon in it's transformed state to blow things up based on the emitters location and rotation values which were attached to the motion captured
player.
Once the machines started talking with each other back and forrth, it was pretty cool and really opened future possibilies up. In this stage I had the armed and unarmed set to key presses since
I didn't want to only work on my project when I was in the black box, using the LEDs to confirm that arduino recieved the signal was really useful too.
Lastly the blue plasma bullets I setup would spawn from arm cannon in it's transformed state to blow things up based on the emitters location and rotation values which were attached to the motion captured
player.
Once the machines started talking with each other back and forrth, it was pretty cool and really opened future possibilies up. In this stage I had the armed and unarmed set to key presses since
I didn't want to only work on my project when I was in the black box, using the LEDs to confirm that arduino recieved the signal was really useful too.
 I had a boolean setup in the arduino code at first to see if the weapon was armed or not but I found it worked better when I had it setup in UE4
 When setting up the VR with motion capture, I tried a ton of things to troubleshoot and had so many hours of troubleshooting, only to figure out a super simple solution. The issue was that when the engine detected a head-mounted display (HMD) it would control the camera with the rotation of the HMD which caused double transformations, once I disabled the HMD transformations, I
was able to just stick a camera on the motion-captured character and didn't have to track the HMD at all.
https://www.instructables.com/DIY-Backfire-Mouse-in-the-Game-PUBG-Gameplay/
To build the Arduino, I roughly followed this tutorial and material list. While this was an inspiration, I had to end up changing a lot of the schematics and programming to make all of this work with Unreal Engine.
And here is the final result from all those hours and days spent troubleshooting and learning.
I was hoping to convey a stronger sense of immersion with the haptic feedback from the Arduino rig. VR is pretty immersive on its own, but having a controller that makes you feel the power of what you’re doing in the game adds another level of realism.
One of the biggest barriers with this project was figuring out what I could do at home, what I needed to do in the motion capture studio, and what pieces I needed to purchase. I had a pretty clear vision for the project going in, but making it a reality took a lot of thought and circuit schematics.
When setting up the VR with motion capture, I tried a ton of things to troubleshoot and had so many hours of troubleshooting, only to figure out a super simple solution. The issue was that when the engine detected a head-mounted display (HMD) it would control the camera with the rotation of the HMD which caused double transformations, once I disabled the HMD transformations, I
was able to just stick a camera on the motion-captured character and didn't have to track the HMD at all.
https://www.instructables.com/DIY-Backfire-Mouse-in-the-Game-PUBG-Gameplay/
To build the Arduino, I roughly followed this tutorial and material list. While this was an inspiration, I had to end up changing a lot of the schematics and programming to make all of this work with Unreal Engine.
And here is the final result from all those hours and days spent troubleshooting and learning.
I was hoping to convey a stronger sense of immersion with the haptic feedback from the Arduino rig. VR is pretty immersive on its own, but having a controller that makes you feel the power of what you’re doing in the game adds another level of realism.
One of the biggest barriers with this project was figuring out what I could do at home, what I needed to do in the motion capture studio, and what pieces I needed to purchase. I had a pretty clear vision for the project going in, but making it a reality took a lot of thought and circuit schematics.
 I'm really glad I learned how to get over some of my coding humps this semester as well as translate them into my area of expertise, gaining these new skills is like taking my 3D art skill tree and gaining points to become more of a technical artist.
If I had the time and more resources, I wish I could have figured out how to get the Arduino BLE communicating with Unreal Engine via Bluetooth as well as with the Occulus via its wireless connection. This would make the gameplay more seamless (especially towards the end when I was tripping over all the wires while wearing the VR headset), but it made for a lot more opportunities for things to go wrong. Since this project already had a lot of talking between different systems, I didn’t want to go too crazy with wireless tech.
I want to design and 3D print a gauntlet to house the Arduino mechanisms. This is something I hope to work on over the break.
Additionally, I want to figure out the wireless functionality. It’s going to take a lot of troubleshooting, but I think it’d be more fun that way.
Last but not least, I want to polish the art and make it more my own. There’s a lot of assets from Unreal’s starter content. The tracking on the emitter isn't perfect, there's no reverse transformation and there's some roughness
with some of the gameplay but overall I'm pretty happy with the results.
It turned out to be more of a tech demo than a pretty game but I can always build this up later with all the new things I learned.
I'm really glad I learned how to get over some of my coding humps this semester as well as translate them into my area of expertise, gaining these new skills is like taking my 3D art skill tree and gaining points to become more of a technical artist.
If I had the time and more resources, I wish I could have figured out how to get the Arduino BLE communicating with Unreal Engine via Bluetooth as well as with the Occulus via its wireless connection. This would make the gameplay more seamless (especially towards the end when I was tripping over all the wires while wearing the VR headset), but it made for a lot more opportunities for things to go wrong. Since this project already had a lot of talking between different systems, I didn’t want to go too crazy with wireless tech.
I want to design and 3D print a gauntlet to house the Arduino mechanisms. This is something I hope to work on over the break.
Additionally, I want to figure out the wireless functionality. It’s going to take a lot of troubleshooting, but I think it’d be more fun that way.
Last but not least, I want to polish the art and make it more my own. There’s a lot of assets from Unreal’s starter content. The tracking on the emitter isn't perfect, there's no reverse transformation and there's some roughness
with some of the gameplay but overall I'm pretty happy with the results.
It turned out to be more of a tech demo than a pretty game but I can always build this up later with all the new things I learned.
home
while (!deck.isInOrder()) {
print 'Iteration ' + i;
deck.shuffle();
i++;
}
print 'It took ' + i + ' iterations to sort the deck.';